Pallet furniture has become a popular trend in home and garden design, offering an eco-friendly and cost-effective way to furnish spaces with unique charm and character. Repurposing wooden pallets, which are often discarded as waste, into stylish and functional furniture pieces allows for creativity and sustainability to flourish. Whether it’s a rustic coffee table, a chic lounge chair, or a whole outdoor seating arrangement, pallet furniture adds a touch of personal craftsmanship to any environment. With a little creativity and some basic tools, you can transform these versatile building blocks into breathtaking pieces that reflect your individual taste and style.
Rustic Pallet Coffee Table
Transform reclaimed wooden pallets into a charming rustic coffee table that becomes the centerpiece of your living room. This DIY project combines the natural textures and tones of the pallets with a sturdy design that is both functional and stylish. Perfect for a cozy or farmhouse-themed space, the table can be customized with your favorite stain or paint to fit seamlessly into your decor.
How to Achieve It
Materials Needed:
– Wooden pallets (2???3, depending on size)
– Sandpaper or electric sander
– Wood screws and a drill
– Wood stain or paint
– Polyurethane sealer
– Casters (optional for mobility)
– Glass top (optional for a smooth surface)
Steps:
1.
Prepare Pallets:
– Disassemble the pallets using a pry bar or hammer.
– Remove all nails and ensure all slats are in good condition.
2.
Sand the Wood:
– Sand each plank thoroughly to remove splinters and smooth the surface.
– Focus on the edges and corners for a polished look.
3.
Assemble the Tabletop:
– Arrange the slats together to form the tabletop, ensuring the best side faces up.
– Secure the slats in place with wood screws to connect them firmly.
4.
Build the Base:
– Using the remaining wood, construct a rectangular frame for the base.
– Attach cross bars inside the frame for additional support.
5.
Attach the Top to the Base:
– Align the tabletop with the base and secure them together with screws.
6.
Finish with Stain or Paint:
– Apply your chosen wood stain for a natural look or paint it for a pop of color.
– Seal with polyurethane to protect the surface.
7.
Install Casters (Optional):
– If desired, attach casters to the base corners for mobility.
8.
Add Glass Top (Optional):
– Place a cut-to-size glass top for a sleek, modern touch.
Color Scheme:
– Opt for earthy tones like walnut or oak stain for a classic rustic feel.
– Use a white or pastel paint for a shabby chic effect.
– Consider a bold color to make a statement in a modern setting.
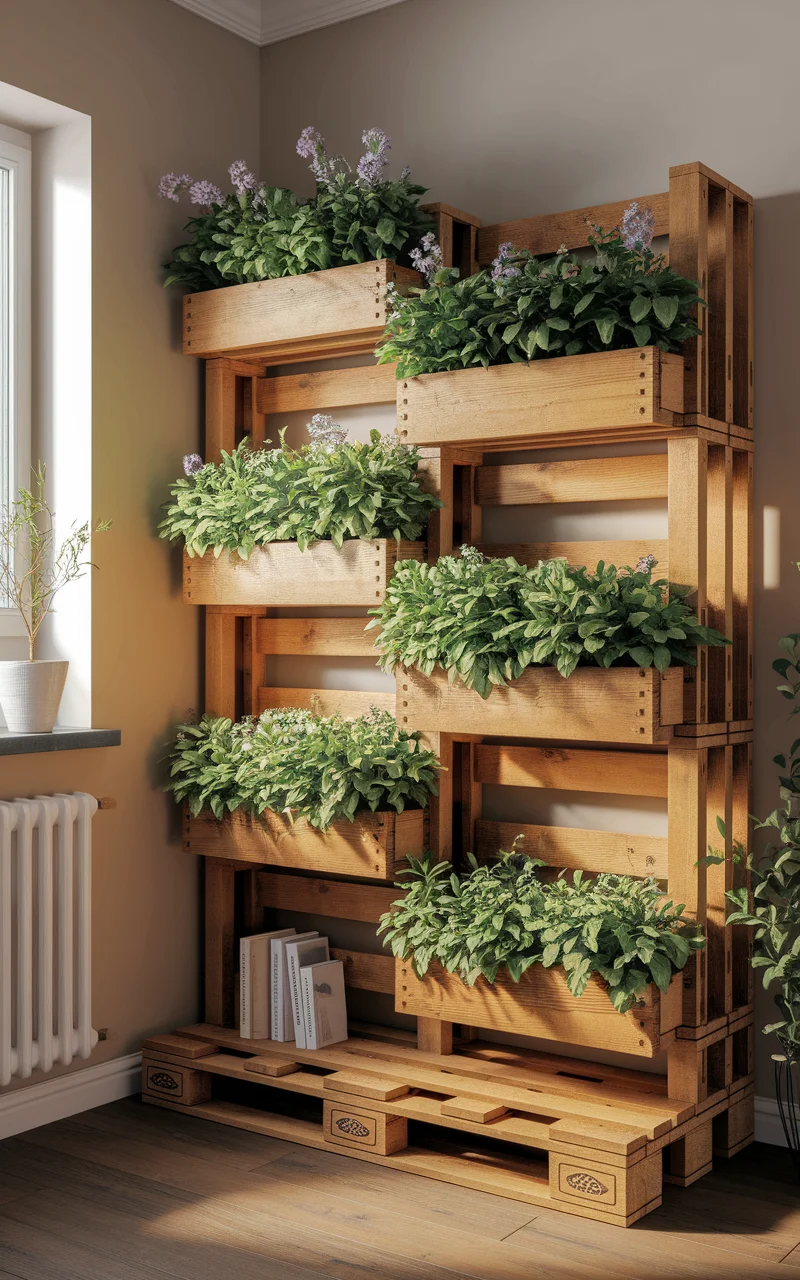
Pallet Bookshelf with Planters
Create a multifunctional piece by turning wooden pallets into a stylish bookshelf with integrated planters. This unique design not only provides storage for your favorite books but also brings a touch of nature indoors. Perfect for small apartments or offices, this pallet bookshelf can be customized with different finishes and types of plants to suit your personal style.
How to Achieve It
Materials Needed:
– Wooden pallets (1???2, depending on desired size)
– Sandpaper or electric sander
– Wood screws and a drill
– Wood stain or paint
– Polyurethane sealer
– Planter boxes or pots
– Plastic lining (optional, for planter sections)
Steps:
1.
Prepare the Pallets:
– Carefully disassemble the pallets using a pry bar or hammer.
– Remove all nails and ensure that the wood is free of any damage.
2.
Sand the Wood:
– Thoroughly sand each piece to remove rough edges and splinters.
– Pay special attention to areas that will be visible or in contact with books and plants.
3.
Assemble the Bookshelf Frame:
– Choose several slats to create the back frame of the bookshelf.
– Attach horizontal slats across the back to form shelves, securing each with wood screws.
4.
Create Planter Sections:
– Designate specific sections of the frame to house planters or create planter boxes using remaining wood pieces.
– Line the planter sections with plastic if needed to prevent water damage to the wood.
5.
Secure Planters:
– Fix the planters or pots into the designated sections, ensuring they are stable.
6.
Finish with Stain or Paint:
– Apply a wood stain for a natural finish or choose paint for a vibrant, custom look.
– Seal the entire unit with a polyurethane sealer to protect against moisture and wear.
7.
Decorate and Arrange:
– Fill the planters with your preferred plants, such as succulents or small herbs.
– Arrange your books and decor items on the shelves to complete the look.
Color Scheme:
– Use a light oak or clear varnish for a fresh, minimalist look.
– Select a rich mahogany or dark stain for an elegant, classic appearance.
– Experiment with pastel shades for a whimsical or eclectic vibe.
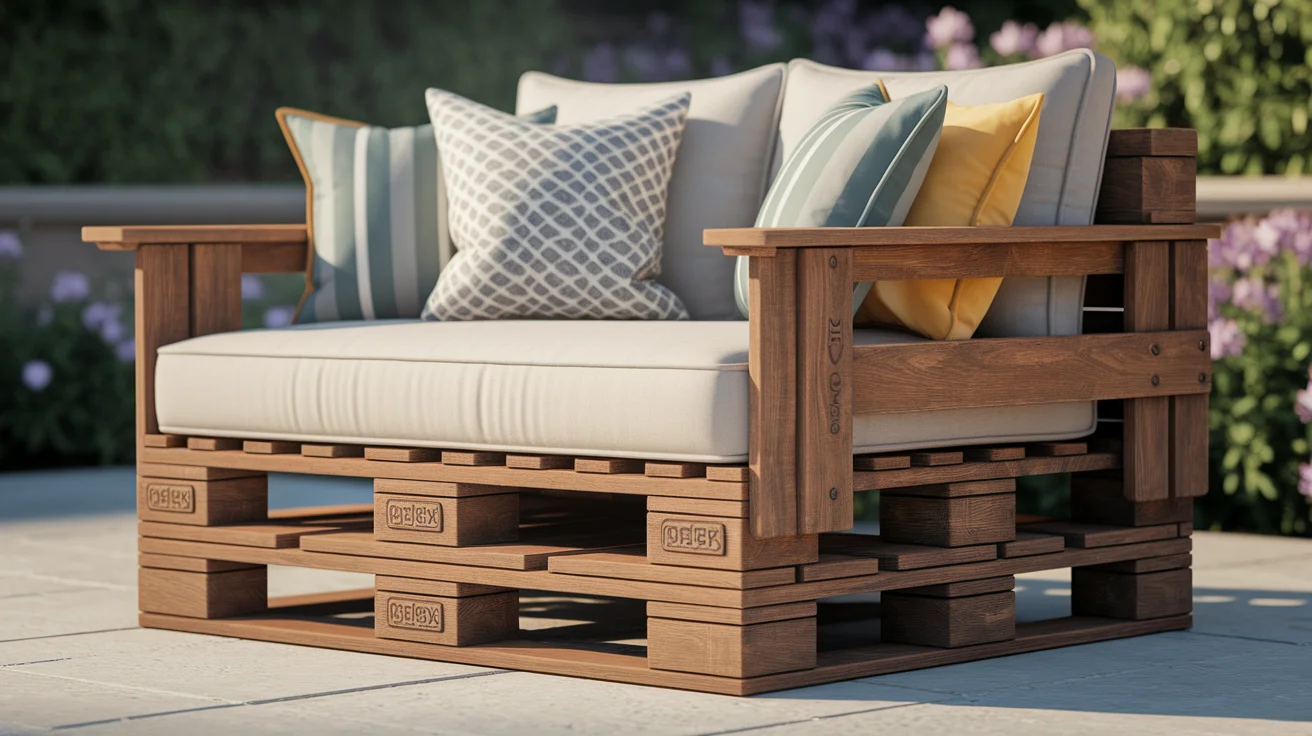
Pallet Lounge Chair with Cushions
Craft a comfortable and stylish lounging area using reclaimed pallets to create a beautiful pallet lounge chair. This DIY furniture piece is perfect for outdoor patios or cozy indoor nooks. With its minimalist design, the lounge chair can be adorned with plush cushions and pillows to match your personal style and provide maximum comfort. This eco-friendly project not only adds a laid-back vibe to your space but also showcases your creativity and commitment to sustainability.
How to Achieve It
Materials Needed:
– Wooden pallets (2???3, depending on desired size)
– Electric saw (for cutting)
– Sandpaper or electric sander
– Wood screws and a drill
– Wood stain or paint
– Polyurethane sealer
– Foam cushions and outdoor fabric
– Staple gun
Steps:
1.
Prepare the Pallets:
– Disassemble the pallets if needed, using a hammer or pry bar.
– Remove all nails and inspect each slat for durability and quality.
2.
Sand the Wood:
– Thoroughly sand all wood pieces to remove splinters and smooth the surfaces.
– Focus on edges and corners for a polished look.
3.
Cut and Assemble the Frame:
– Cut the pallet wood to desired dimensions for the chair frame (seat and backrest).
– Arrange the slats for the seat and backrest, securing them with wood screws to form a sturdy frame.
4.
Construct Armrests (Optional):
– Cut additional pallet wood to create armrests, if desired, and attach them securely to the main frame.
5.
Finish the Wood:
– Apply your chosen wood stain or paint for a customized look.
– Seal with polyurethane for weather resistance, especially if used outdoors.
6.
Create Cushions:
– Cut foam to fit the seat and backrest dimensions.
– Wrap foam in outdoor fabric, securing it with a staple gun for durability.
7.
Assemble and Enjoy:
– Place the cushions on the chair frame, arranging them for maximum comfort.
– Add decorative pillows or throws for additional style and coziness.
Color Scheme:
– Choose a natural wood stain for a classic, rustic appeal.
– Opt for bright or patterned fabric to make the chair pop and add visual interest.
– Use neutral colors with textured fabrics for a modern, elegant look.
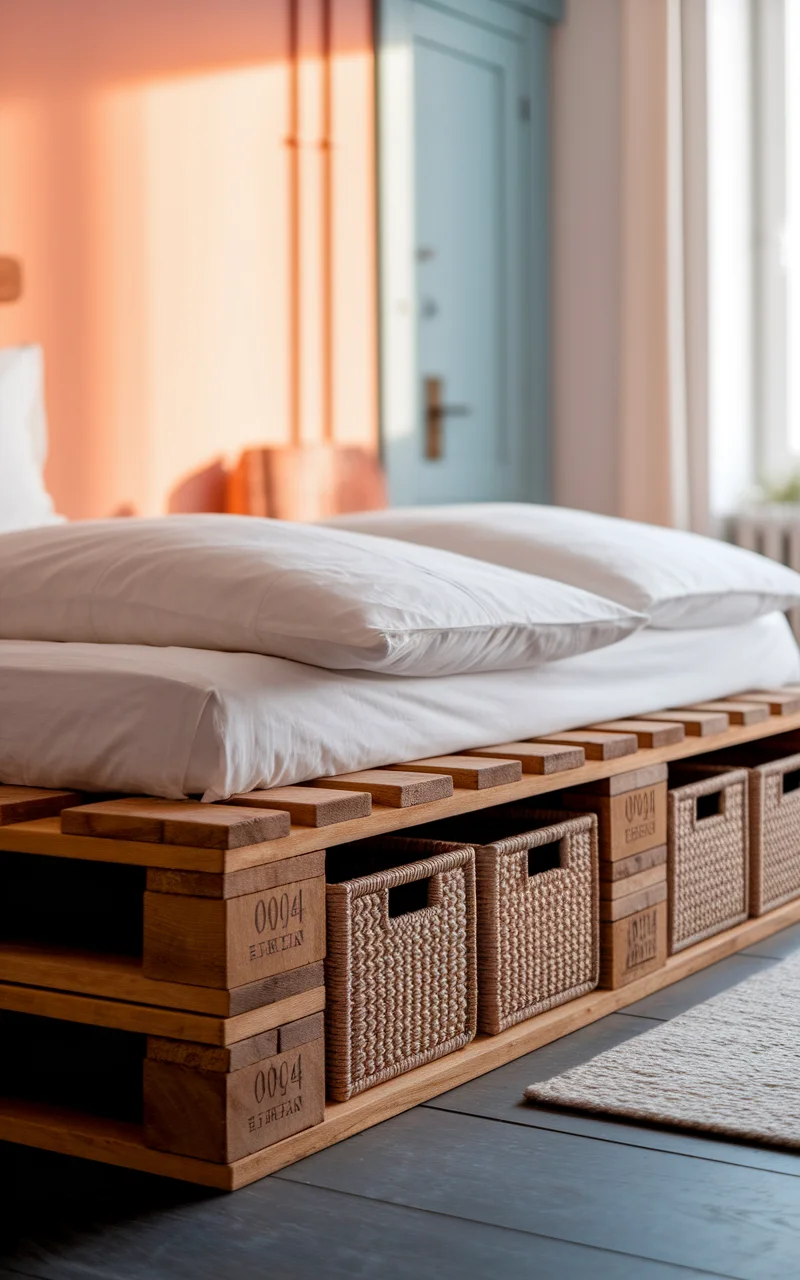
Pallet Bed Frame with Underbed Storage
Maximize your bedroom’s functionality and aesthetic appeal by constructing a pallet bed frame with integrated underbed storage. This innovative DIY project not only provides a stylish and economical solution for your sleeping area but also offers ample storage for linens, clothes, and other essentials. Utilizing wooden pallets for this project adds a rustic charm while promoting sustainability in your home decor.
How to Achieve It
Materials Needed:
– Wooden pallets (4???6, based on bed size)
– Sandpaper or electric sander
– Wood screws and a drill
– Measuring tape
– Wood stain or paint
– Polyurethane sealer
– Storage bins or baskets
Steps:
1.
Prepare the Pallets:
– Disassemble the pallets if necessary, using a pry bar or hammer.
– Remove nails and examine each slat for stability and quality.
2.
Sand the Wood:
– Sand each piece thoroughly to smooth rough edges and surfaces.
– Concentrate on edges and corners for a refined appearance.
3.
Assemble the Bed Frame:
– Arrange pallets in the desired bed frame configuration, allowing space for storage access.
– Secure pallets together using wood screws, ensuring a sturdy foundation.
4.
Create Underbed Storage:
– Designate sections of the frame for storage bins or baskets.
– Measure and ensure the bins fit smoothly under the pallet slats.
5.
Finish with Stain or Paint:
– Apply a wood stain for a natural, rustic look or paint for a more personalized touch.
– Seal with polyurethane to protect against wear and moisture.
6.
Organize and Decorate:
– Slide bins or baskets into designated storage spaces, organizing your items as needed.
– Dress the bed with your choice of bedding to enhance the overall aesthetic.
Color Scheme:
– Opt for a natural wood finish to maintain a rustic, organic vibe.
– Use white or light colors for a clean, minimalist look that brightens the room.
– Consider bold or dark tones to make a dramatic statement in a contemporary space.
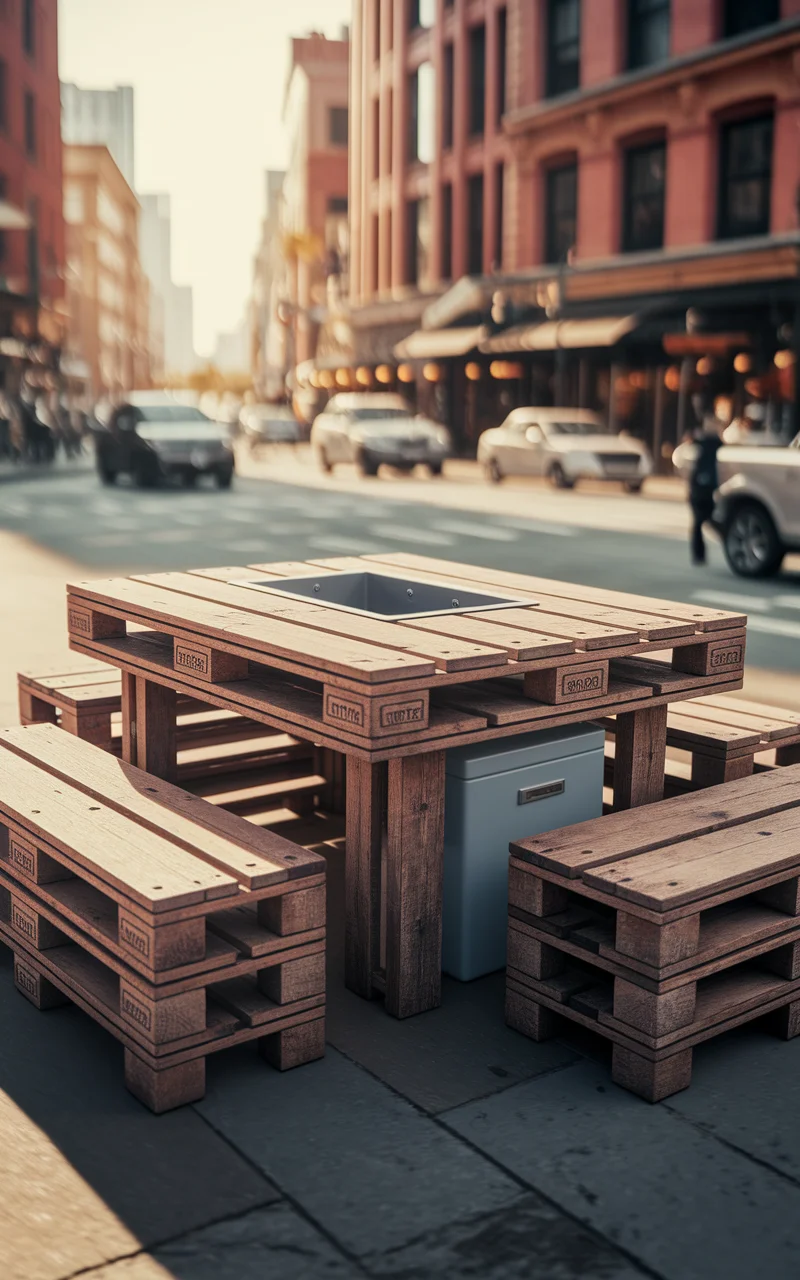
Pallet Dining Set with Built-In Cooler
Elevate your dining experience by crafting a unique pallet dining set with a built-in cooler. This innovative furniture piece is perfect for outdoor gatherings, allowing you to keep drinks chilled within arm’s reach. By creatively repurposing wooden pallets, you can achieve a rustic aesthetic that beautifully complements an alfresco dining setting. Ideal for backyard barbecues or casual dining under the stars, this project combines functionality and charm in one standout piece.
How to Achieve It
Materials Needed:
– Wooden pallets (4???6, depending on the desired size)
– Sandpaper or electric sander
– Wood screws and a drill
– Cooler insert or plastic bin
– Waterproof liner
– Wood stain or paint
– Polyurethane sealer
– Additional wood for benches (optional)
Steps:
1.
Prepare the Pallets:
– Disassemble the pallets using a pry bar or hammer.
– Remove all nails and ensure the wood is in good condition.
2.
Sand the Wood:
– Sand all wood pieces thoroughly to remove splinters and rough spots.
– Pay attention to the surfaces and edges for a smooth finish.
3.
Construct the Table:
– Arrange pallet slats to form a tabletop, leaving a space in the center for the cooler.
– Secure slats together with wood screws, ensuring a sturdy surface.
4.
Install the Built-In Cooler:
– Fit a cooler insert or plastic bin into the center cutout of the table.
– Line it with a waterproof liner to prevent leaks and moisture damage.
5.
Build the Table Base:
– Use additional wood to create a strong base and attach it securely to the tabletop.
6.
Create Matching Benches (Optional):
– Assemble benches using the remaining pallet wood to match the table style.
– Secure with wood screws and arrange for comfort and stability.
7.
Finish with Stain or Paint:
– Apply your choice of wood stain for a natural appearance, or paint for a pop of color.
– Seal with polyurethane to protect against weather elements, especially for outdoor use.
Color Scheme:
– Opt for earthy tones like cedar or oak for a classic, rustic feel.
– Choose a bright color, such as teal or red, for a fun and vibrant look.
– Use a clear sealant for a modern minimalist aesthetic that highlights the natural wood grain.
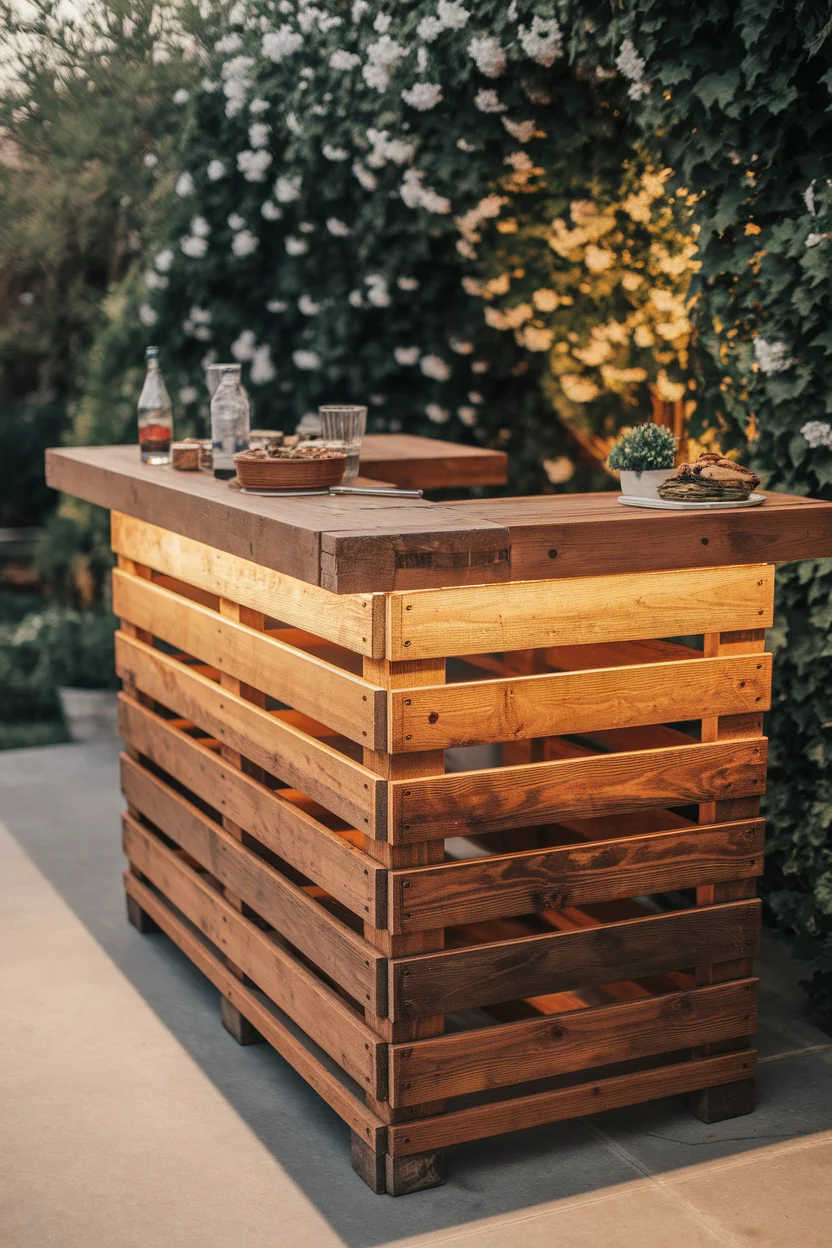
Pallet Outdoor Bar Counter
Turn wooden pallets into a striking outdoor bar counter, perfect for entertaining guests in your garden or patio. This versatile DIY project blends rustic charm with functionality, providing a stylish space to serve drinks and snacks during outdoor gatherings. With added storage shelves and a sturdy workspace, the pallet bar counter can be tailored to fit your entertaining needs and space constraints.
How to Achieve It
Materials Needed:
– Wooden pallets (3???4, based on the desired size)
– Sandpaper or electric sander
– Wood screws and a drill
– Wood stain or paint
– Polyurethane sealer
– Additional wood for shelving
– Hinges (optional, for a folding counter section)
Steps:
1.
Prepare the Pallets:
– Disassemble the pallets using a pry bar or hammer.
– Remove all nails and ensure the wood is in good condition and splinter-free.
2.
Sand the Wood:
– Thoroughly sand each piece of wood to smooth surfaces and round off sharp edges.
– Focus on ensuring the bar top is especially smooth for safe use.
3.
Assemble the Bar Frame:
– Use pallet wood to construct a rectangular frame for the bar counter.
– Secure the frame with wood screws for stability.
4.
Build the Countertop:
– Arrange pallet slats to form a smooth, even countertop.
– Use additional screws to firmly secure slats to the frame.
5.
Add Storage Shelves:
– Install shelving units inside the bar frame using additional wood planks.
– Attach these securely to store bottles, glasses, and other bar essentials.
6.
Optional Folding Section:
– Install a folding section on the side of the bar with hinges for additional counter space.
7.
Finish with Stain or Paint:
– Apply your chosen stain or paint to achieve the desired look.
– Finish with a polyurethane sealer to protect against outdoor elements.
Decorative Tips:
– Add ambient lighting, such as fairy lights or lanterns, to enhance the ambiance.
– Incorporate hooks or hangers for bar tools or towels.
Color Scheme:
– Choose natural wood tones for a rustic, traditional look.
– Opt for bold colors like navy or forest green to add a contemporary twist.
– Use a simple white paint for a clean and classic coastal vibe.
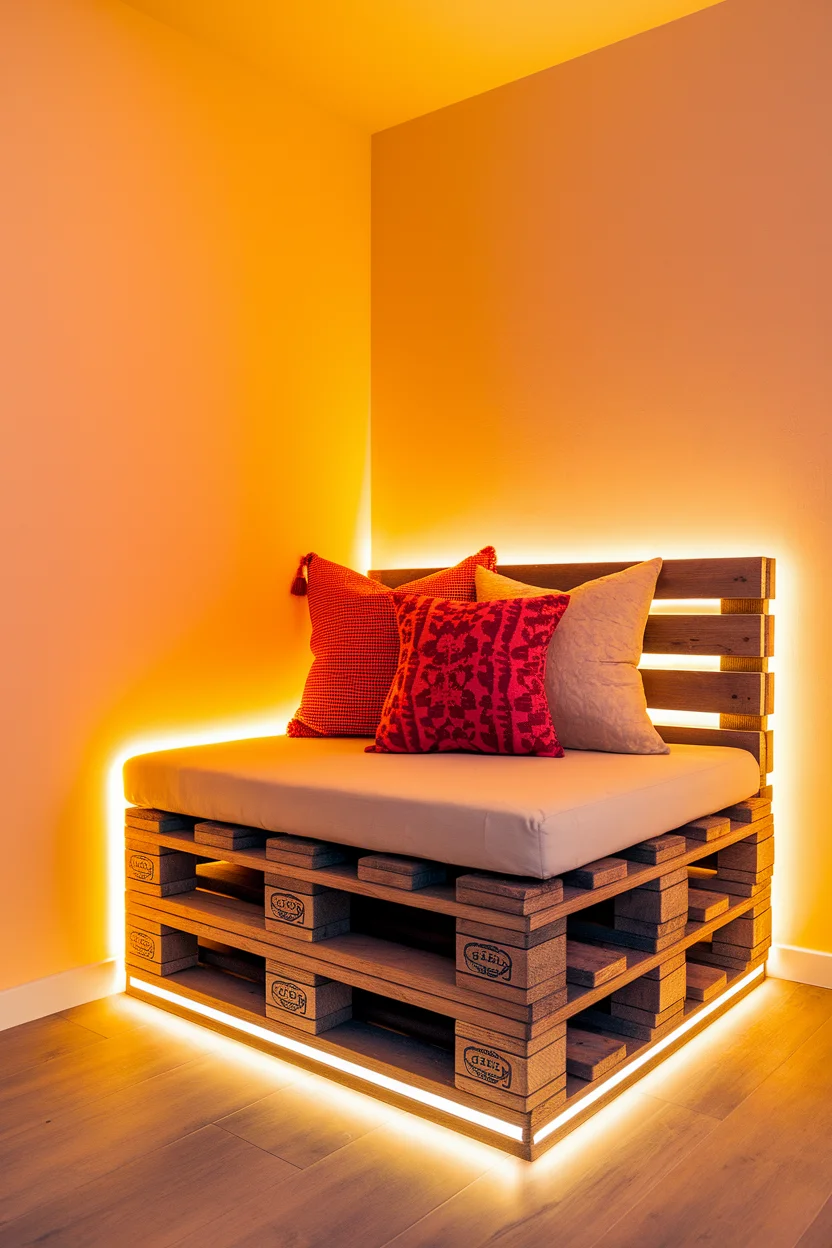
Pallet Reading Nook with Built-In Lighting
Design a cozy and inviting reading nook using wooden pallets, complete with built-in lighting for evening relaxation. This project offers a dedicated space for book lovers to unwind while adding a unique touch to any room or corner. By integrating warm LED lights beneath the pallet structure, this reading nook transforms into a magical hideaway perfect for all ages.
How to Achieve It
Materials Needed:
– Wooden pallets (2???4, depending on size and design)
– Sandpaper or electric sander
– Wood screws and a drill
– Wood stain or paint
– Polyurethane sealer
– LED strip lights or puck lights
– Cushions and throw pillows
Steps:
1.
Prepare the Pallets:
– Disassemble the pallets using a pry bar or hammer, if necessary.
– Remove all nails and ensure all slats are in excellent condition.
2.
Sand the Wood:
– Sand each piece thoroughly to eliminate splinters and smooth the surfaces.
– Focus on areas where you’ll be sitting or leaning for added comfort.
3.
Assemble the Nook Frame:
– Use pallet slats to construct a simple, sturdy frame that forms the base and backrest.
– Secure the structure with wood screws.
4.
Install the Lighting:
– Attach LED strip lights or puck lights to the underside of the backrest or around the nook’s edges.
– Ensure the lights are installed securely and arrange the wiring neatly.
5.
Finish with Stain or Paint:
– Apply wood stain for a natural look or paint for a colorful flair.
– Seal with polyurethane to protect the wood and improve durability.
6.
Add Cushions and Decor:
– Arrange cushions and throw pillows on the seating area of your nook for added comfort.
– Select a variety of textures and colors to suit your personal style.
Color Scheme:
– Use soft, neutral tones like beige or light gray for a calming atmosphere.
– Opt for bolder colors, like navy or teal, to create a focal point in your room.
– Pair the chosen wood finish with warm lighting to enhance coziness.
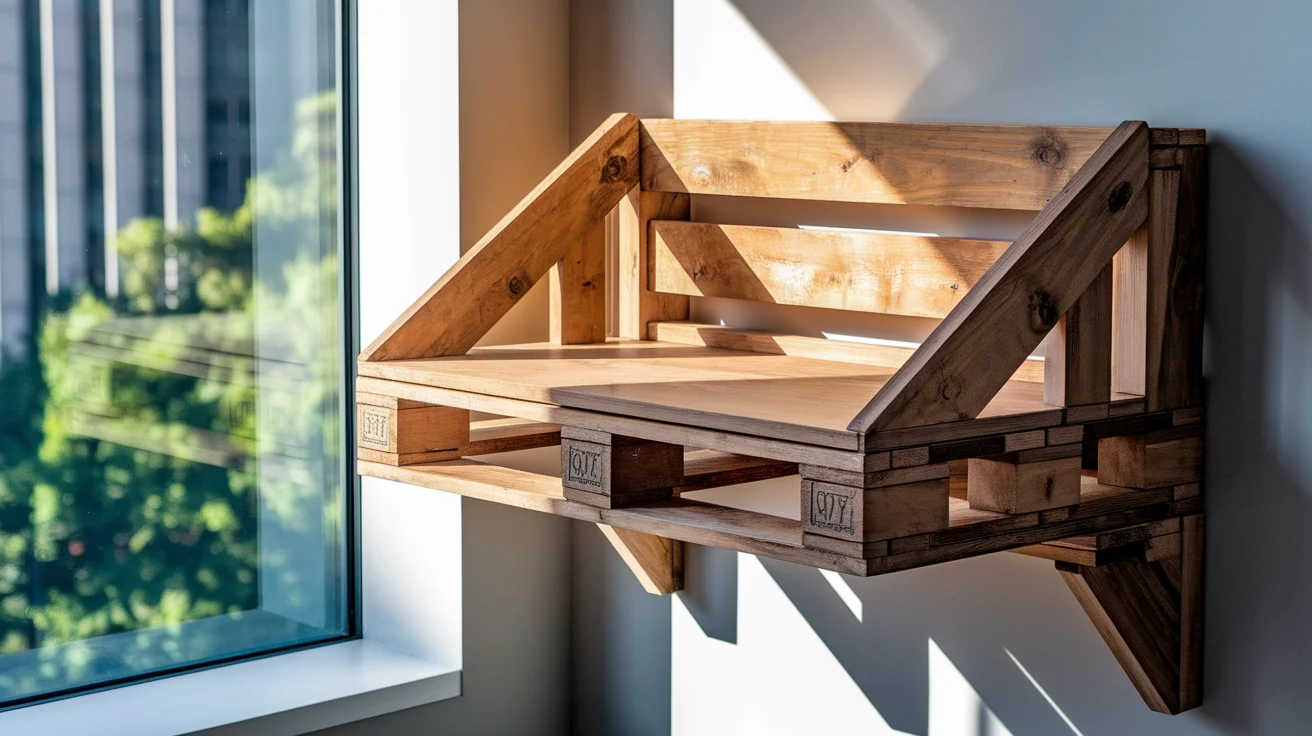
Pallet Wall-Mounted Desk
Create a compact, wall-mounted desk from reclaimed pallets that integrates seamlessly into any room. This space-saving DIY project is perfect for small home offices or study spaces where functionality and style are essential. The desk provides a chic, rustic workspace that can be customized with stains or paints to match your interior design, while also offering storage for your office essentials on a vertical plane.
How to Achieve It
Materials Needed:
– Wooden pallets (1???2, depending on desired desk size)
– Sandpaper or electric sander
– Wood screws and a drill
– Wall mounts or brackets
– Wood stain or paint
– Polyurethane sealer
Steps:
1.
Prepare the Pallets:
– Disassemble the pallets using a pry bar or hammer.
– Remove all nails and select the best slats for your desk surface.
2.
Sand the Wood:
– Thoroughly sand each wood piece to ensure a smooth finish free of splinters.
– Pay particular attention to the edges and corners for a polished look.
3.
Assemble the Desk Surface:
– Arrange the slats side by side to form a flat desk surface.
– Secure the slats with wood screws to maintain a sturdy construction.
4.
Attach Supporting Frame:
– Use additional slats to create a frame beneath the desk surface for additional support.
– Ensure the frame is securely fastened to prevent wobbling.
5.
Mount to the Wall:
– Install wall mounts or brackets at the desired height on your wall.
– Attach the desk to these mounts, ensuring it is level and secure.
6.
Finish with Stain or Paint:
– Apply your chosen stain for a natural, warm finish or paint for a vibrant look.
– Seal with polyurethane to protect the surface from impacts and wear.
Color Scheme:
– Opt for a light stain for a Scandinavian-inspired, minimalist design.
– Use a rich walnut stain for a traditional, elegant look.
– Consider bold, contrasting colors like black or emerald green to make the desk a statement piece.
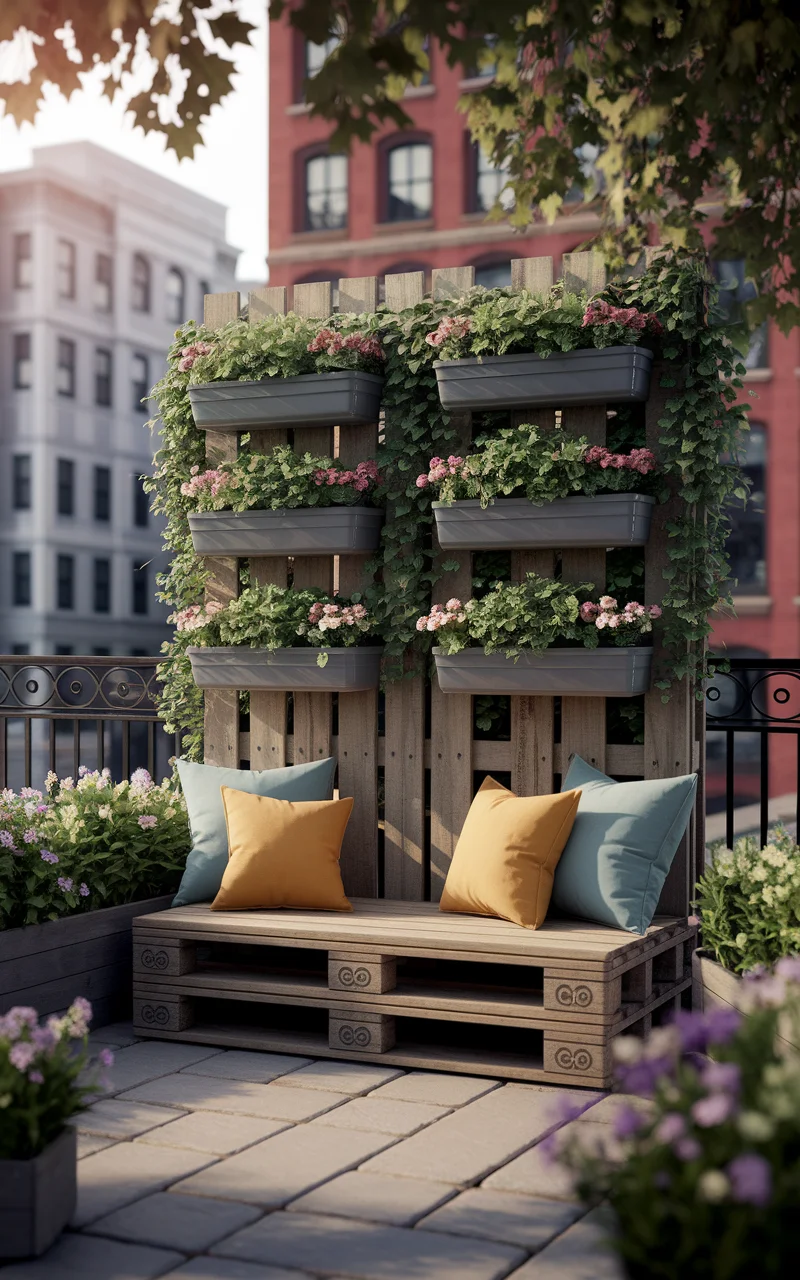
Pallet Vertical Garden with Integrated Seating
Transform your outdoor space into a lush retreat by creating a pallet vertical garden with integrated seating. This multifunctional design combines plant display and seating in a single, cohesive structure, perfect for small gardens or patios. By arranging pallets vertically for plant growth and incorporating a bench at the base, you can enjoy nature while seamlessly blending greenery with functional seating. Customize the layout and choice of plants to suit your taste and space requirements.
How to Achieve It
Materials Needed:
– Wooden pallets (4???5, depending on size)
– Sandpaper or electric sander
– Wood screws and a drill
– Wood stain or paint
– Polyurethane sealer
– Plastic planters or pots
– Potting soil and plants
– Outdoor cushions (optional for the bench)
Steps:
1.
Prepare the Pallets:
– Disassemble the pallets using a pry bar or hammer as needed.
– Remove all nails and evaluate the condition of the slats.
2.
Sand the Wood:
– Sand all wood pieces thoroughly, focusing on any areas that will be in contact with people or plants.
– Ensure the wood is smooth to avoid splinters.
3.
Assemble the Vertical Structure:
– Use upright pallet slats to construct the vertical portion for plant placement.
– Secure the structure with wood screws for stability.
4.
Install Planters:
– Attach planters or pots to the vertical slats, ensuring they are evenly positioned and secure.
– Fill the planters with potting soil and plant your selected greenery or flowers.
5.
Build the Integrated Seating:
– Construct a bench at the base using remaining pallet wood, ensuring it’s sturdy.
– Line with outdoor cushions for added comfort, if desired.
6.
Finish with Stain or Paint:
– Apply a wood stain for a rustic, natural look or paint for a colorful, vibrant finish.
– Seal with polyurethane to enhance durability and protect against the elements.
Color Scheme:
– Opt for natural wood tones to blend with the plant life for a cohesive organic look.
– Use bright, cheerful colors like sunflower yellow or sky blue to add a playful touch.
– Choose neutral tones such as gray or beige to maintain a modern, understated aesthetic.
Pallet Garden Bench with Planter Armrests
Combine seating and gardening with a pallet garden bench featuring built-in planter armrests. This innovative design provides a comfortable seating area while integrating space for plants, allowing you to enjoy floral scents or grow herbs right next to your favorite outdoor spot. Ideal for gardens, patios, or balconies, this project is a stylish and practical way to bring nature closer to your living space.
How to Achieve It
Materials Needed:
– Wooden pallets (3???4, depending on bench size)
– Sandpaper or electric sander
– Wood screws and a drill
– Wood stain or paint
– Polyurethane sealer
– Planter boxes or built-in planter liners
– Potting soil and plants
– Outdoor cushions (optional for added comfort)
Steps:
1.
Prepare the Pallets:
– Disassemble the pallets using a pry bar or hammer.
– Remove all nails and inspect each slat for quality and strength.
2.
Sand the Wood:
– Sand each piece thoroughly to remove splinters and smooth surfaces.
– Pay particular attention to seating and contact areas.
3.
Assemble the Bench Frame:
– Use pallet slats to construct the main frame of the bench, ensuring a sturdy foundation.
– Secure slats with wood screws to maintain stability.
4.
Create Planter Armrests:
– Use the remaining pallet wood to build armrests on each side of the bench, leaving flat-topped sections to act as planters.
– Install planter liners or place planter boxes in the prepared sections to contain soil and plants.
5.
Finish with Stain or Paint:
– Apply a wood stain for a natural appearance, or paint for a more vibrant, personalized touch.
– Seal with polyurethane to protect the wood from weather elements.
6.
Plant Selection and Arrangement:
– Fill the armrest planters with potting soil and choose your desired plants, such as flowers or herbs.
– Arrange the plants for optimal growth and aesthetic appeal.
7.
Optional Cushion Addition:
– Place outdoor cushions on the seating area for enhanced comfort.
Color Scheme:
– Choose earthy tones, like teak or pine, to complement the natural plant elements.
– Opt for bright, lively colors to create a standout feature that highlights the built-in planters.
– Use neutral shades such as gray or beige for a versatile look that fits in various settings.