Transform your culinary space into a functional masterpiece with the addition of a genius kitchen island. Whether you???re seeking extra storage, a convenient cooking station, or a cozy spot for casual dining, the kitchen island offers a versatile solution that can be tailored to your needs. In this article, we explore innovative kitchen island ideas that blend style and practicality, turning your kitchen into the heart of your home.
Dual-Level Kitchen Island for Functional Versatility
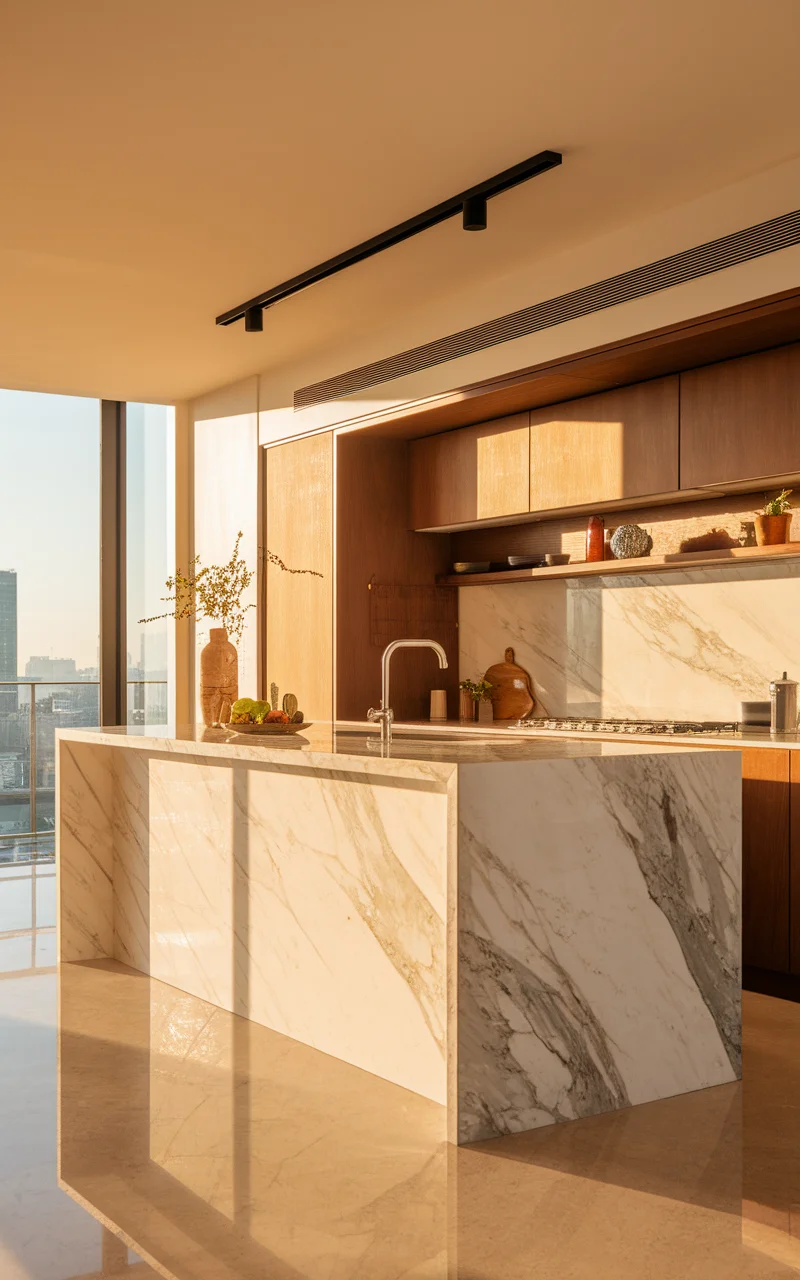
A dual-level kitchen island is a brilliant idea for maximizing both functionality and aesthetics in your kitchen space. This design features two different levels: a lower level for food preparation and cooking, and an elevated tier that serves as a dining or bar area. This separation not only helps maintain an organized cooking space but also creates a casual dining environment where family and friends can gather without interfering with the kitchen workflow. The contrasting heights can be enhanced with complementary color schemes, such as a sleek marble surface for the prep area paired with a warm wood finish for the dining bar, creating a visually appealing and inviting space.
How to Achieve It
Plan the Space
:
– Measure your kitchen to ensure there???s ample space for a two-tier island.
– Allocate a minimum of 36 to 42 inches for clearance around the island to ensure easy movement.
Design the Layout
:
– Determine the proportions of each level based on your needs ??? the prep area should be larger if cooking is the primary use.
– Consider the height difference for comfort; typically, the counter is about 36 inches high, while the dining level is around 42 inches.
Select Materials and Finishes
:
– Choose durable, easy-to-clean surfaces like quartz or granite for the prep counter.
– Opt for complementary or contrasting materials for the dining area, such as warm-toned wood or glossy laminate.
– Incorporate colors that match or complement your kitchen???s existing palette.
Incorporate Functional Elements
:
– Add storage solutions like drawers or shelves to the lower tier for easy access to utensils and cooking essentials.
– Integrate a sink or a stovetop on the prep level if plumbing and electrical setup allow.
Add Seating
:
– Select comfortable bar stools that match the island???s style and height.
– Leave adequate overhang (about 12 inches) on the raised tier to ensure comfortable legroom.
Finalize Electricals and Lighting
:
– Install appropriate task lighting above the prep area and ambient lighting for the dining level.
– Consider electrical outlets on the prep side for appliances or charging devices.
Professional Installation
:
– Engage a carpenter or a contractor experienced with kitchen renovations to build and install the island.
Finishing Touches
:
– Accessorize with decorative items like a centerpiece or potted herb plants on the elevated tier for a homely touch.
Convertible Kitchen Island with Hidden Storage and Seating
A convertible kitchen island cleverly combines form and function by featuring hidden storage solutions and foldable seating options. This innovative design is perfect for smaller kitchens where space optimization is key. The island’s core concept revolves around incorporating pull-out drawers, cabinets, and shelves seamlessly into its structure, providing ample storage for kitchen essentials without cluttering the counter space. Additionally, the island can be equipped with foldable bar stools or a hidden bench that slides out for dining, then tucks away when not in use. This setup allows for a clean, modern aesthetic while maximizing functionality.
How to Achieve It
Assess Your Space
– Measure the kitchen area to determine the maximum dimensions for the island while ensuring a comfortable flow in the room.
– Allow for a minimum clearance of 36 inches around the island for easy access and mobility.
Design the Island Structure
– Draft a layout incorporating built-in storage such as pull-out drawers, shelves, and cabinets.
– Design seating that can be nestled underneath or integrated as a pull-out/folding option.
– Keep the surface area streamlined for versatility in cooking, working, or dining.
Select Materials
– Choose materials like engineered wood, stainless steel, or laminates that are durable and easy to clean.
– Opt for sleek finishes in neutral tones or bold colors that match or contrast with your kitchen decor.
– Consider materials that are lightweight and durable for the foldable seating elements.
Incorporate Functional Details
– Design hidden compartments for larger kitchen items like pots, pans, or small appliances.
– Integrate organizers within drawers for cutlery, spices, or other frequently used items.
– Plan the seating mechanics, such as sliders or hinges, for the foldable seating to ensure ease of use.
Lighting and Electrical Fixtures
– Install task lighting fixtures overhead for effective illumination of the workspace on the island.
– Consider adding accessible outlets on the island???s side for small kitchen appliances or charging devices.
Coordinate with Professionals
– Collaborate with a kitchen designer or contractor to bring your convertible island design to life.
– Ensure all mechanical components for foldable features are securely installed and easy to operate.
Decorative Touches
– Add a splash of color with kitchen towels, mats, or a decorative fruit bowl on the island.
– Set small potted herbs along the island???s edge to add a fresh, vibrant aesthetic.

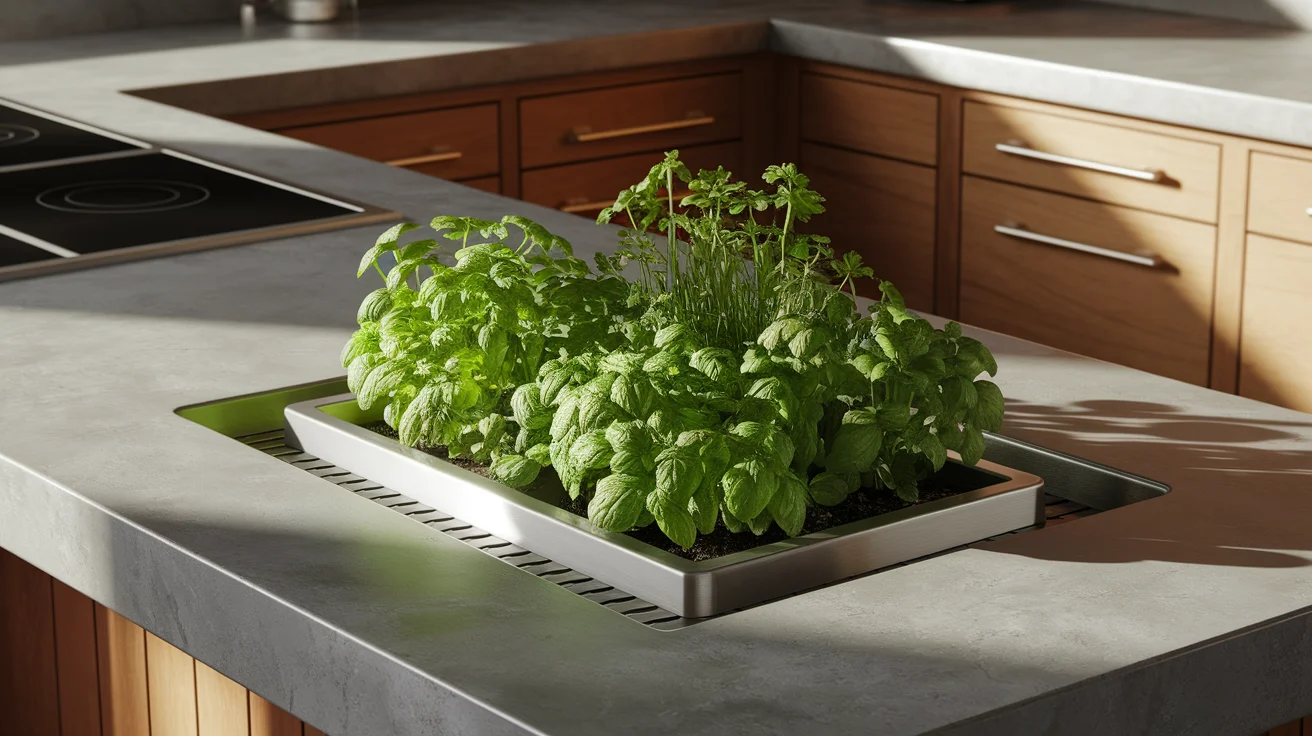
Smart Kitchen Island with Integrated Herb Garden
A smart kitchen island with an integrated herb garden takes the concept of functionality to the next level by incorporating a built-in planter for fresh herbs. This design not only enhances the aesthetic appeal of your kitchen with a touch of greenery but also provides a convenient and sustainable way to access fresh herbs while cooking. Imagine snipping fresh basil, mint, or thyme right from your kitchen island while whipping up your favorite meals! This eco-friendly idea adds life and color to your kitchen, making it both visually appealing and olfactorily delightful.
How to Achieve It
Plan the Layout
– Measure your kitchen space to accommodate an island with an integrated planter.
– Ensure there is enough clearance (at least 36 inches) around the island for smooth movement.
Design the Island
– Incorporate a recessed section in the island’s countertop for the herb planter.
– Ensure the planter is accessible yet discreetly integrated to maintain a clean look.
– Consider a modular design that allows the planter to be removable for easy maintenance and customization.
Select Materials and Finishes
– Use waterproof and durable materials like stainless steel or treated wood for the planter area.
– Opt for a countertop material that complements the planter, such as stone or concrete.
– Choose a color scheme that highlights the greenery, perhaps with earth tones or neutral colors like beige, charcoal, or navy.
Set Up the Herb Planter
– Choose herbs that thrive indoors, such as basil, parsley, mint, or chives.
– Incorporate a drainage system or use planters with drainage holes and trays to prevent water buildup.
– Use high-quality potting soil and ensure adequate lighting, possibly with a grow light embedded above the planter.
Install Electrical and Irrigation Systems
– Include electrical outlets on the island for small kitchen appliances or a built-in lighting solution.
– Consider an automated irrigation system to simplify the watering process, ensuring herbs receive consistent moisture.
Professional Assistance
– Collaborate with a kitchen designer or a contractor to integrate the planter with precision.
– Consult a gardening expert for advice on selecting herbs and setting up the planter system.
Finishing Touches
– Add decorative elements like herbal markers or small garden-themed decor.
– Arrange a few cooking essentials or a decorative fruit bowl around the planter for a cohesive look.
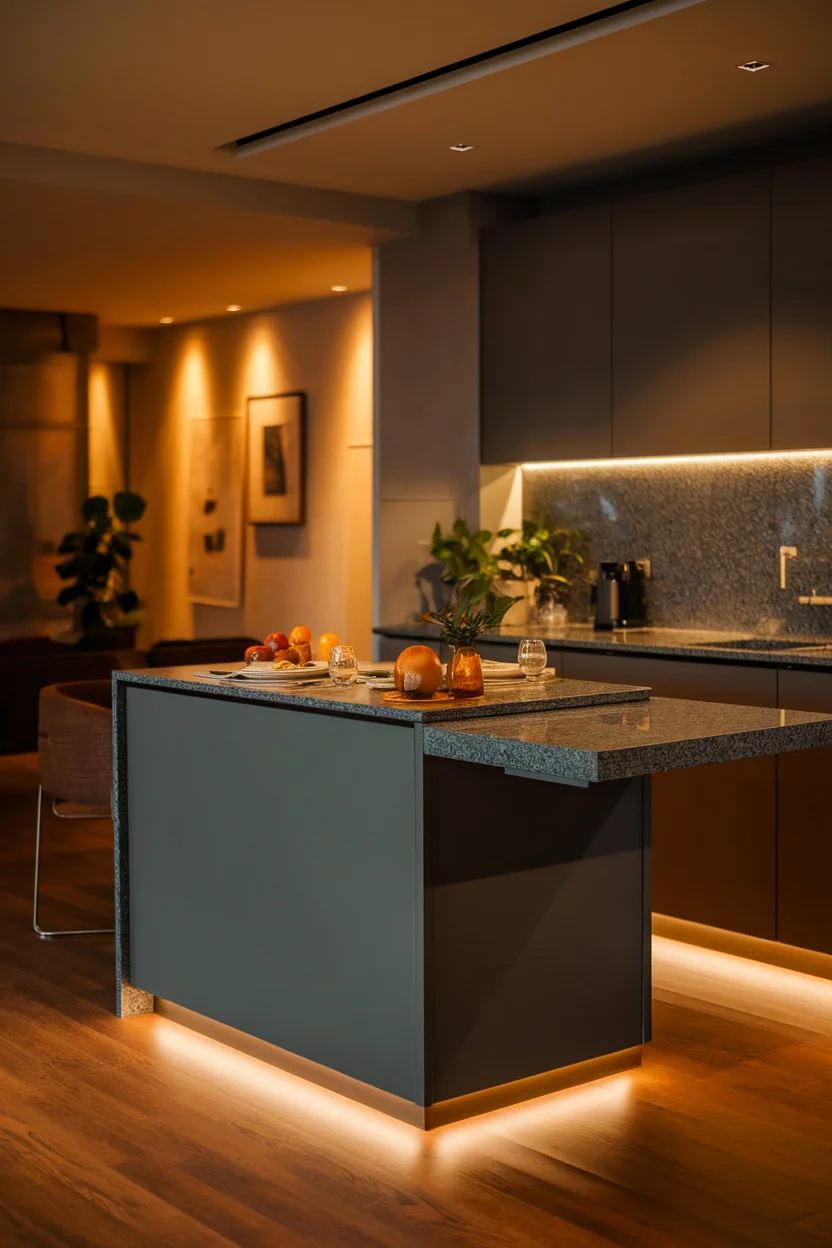
Floating Kitchen Island with Under-Glow Lighting
A floating kitchen island with under-glow lighting is a contemporary design idea that introduces an element of elegance and modernity to your culinary space. The “floating” effect is achieved by elevating the island slightly above the floor and installing LED lights beneath it, creating a captivating under-glow that subtly illuminates the kitchen floor. This setup not only enhances the ambiance by adding a warm, inviting glow but also serves as a practical feature by providing soft lighting for nighttime or low-light scenarios. This innovative design is ideal for open-concept kitchens that benefit from a touch of drama and sophistication, making the island a standout centerpiece.
How to Achieve It
Plan the Installation
– Measure your kitchen to determine the right size and placement for the floating island.
– Ensure there???s adequate space (at least 36 inches) around the island for ease of movement.
Design the Layout
– Decide on the elevation height for the island; typically, a few inches off the floor is sufficient to create the floating effect.
– Incorporate necessary functional elements such as a prep area, storage, or dining space as per your need.
Select Materials and Finishes
– Choose a sleek, durable countertop material like quartz, granite, or stainless steel.
– Opt for a high-quality, easy-to-clean finish for the base that complements the kitchen???s overall color scheme.
Integrate Under-Glow Lighting
– Select LED strip lights or recessed lighting to be installed underneath the island.
– Choose a lighting color that matches the kitchen vibe; soft white or warmer tones create a cozy atmosphere, while cool blues or greens add a modern touch.
– Ensure the lighting is dimmable to adjust the ambiance as desired.
Coordinate Electrical and Structural Setup
– Work with a licensed electrician to install wiring for the under-glow lighting, ensuring safety standards are met.
– Engage a contractor or carpenter experienced in building floating structures to achieve the desired elevation.
Professional Installation
– Hire professionals for both electrical work and the island installation to ensure stability and functionality.
– Double-check that the island is securely anchored and that all wiring is concealed yet accessible for maintenance.
Finishing Touches
– Add bar stools or seating that match the island???s design for a cohesive look.
– Consider placing decorative elements, such as a centerpiece or ambient pieces, to enhance the luxurious feel.

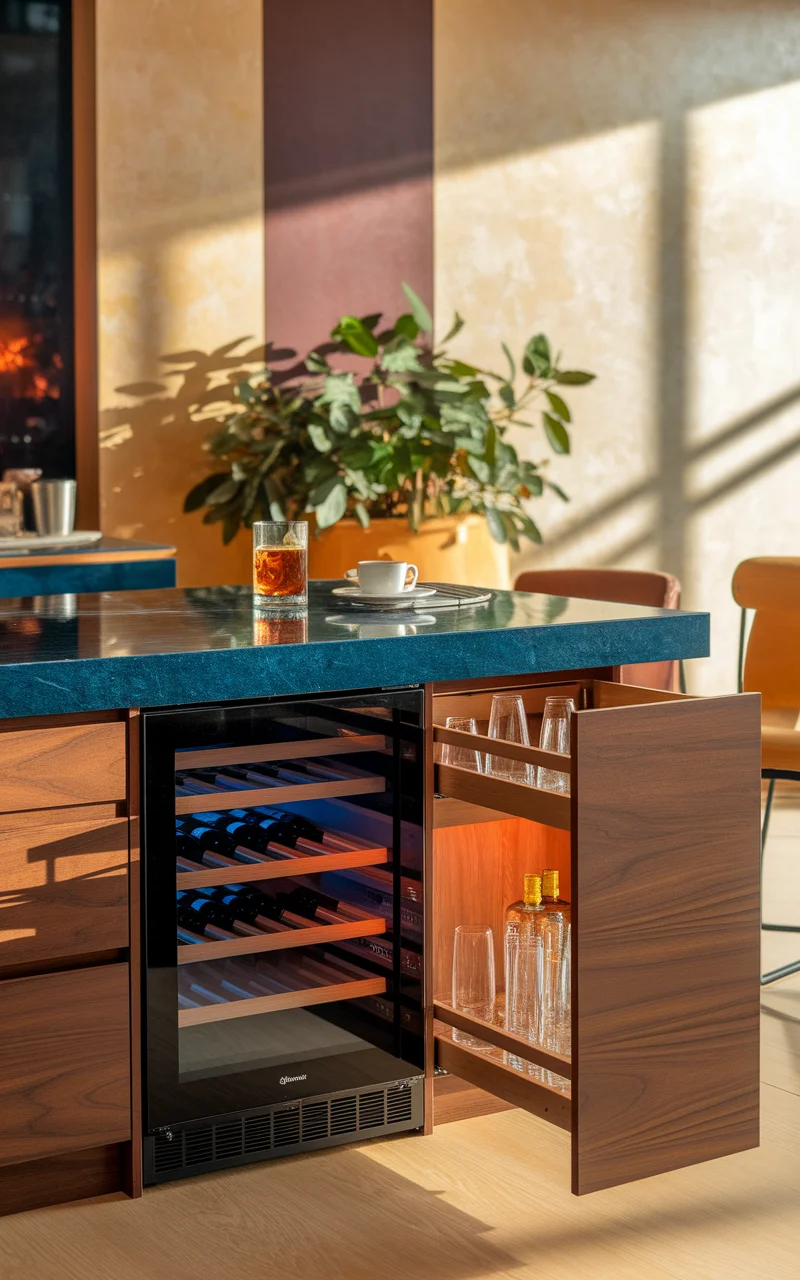
Multifunctional Kitchen Island with Integrated Beverage Station
A multifunctional kitchen island with an integrated beverage station elevates the social and functional aspects of your kitchen. This innovative design incorporates a dedicated section within the island to store and serve beverages, perfect for entertaining guests or simply enjoying a leisurely evening at home. Featuring a built-in wine cooler or mini-fridge, a pull-out drawer to organize glasses and accessories, and a countertop space for mixing drinks or serving coffee, this idea seamlessly blends utility with style. By transforming a part of your kitchen island into a beverage hub, you not only optimize space but also enrich the culinary experience.
How to Achieve It
Space Planning
– Measure the available kitchen space to determine the dimensions and placement of the island.
– Ensure at least 36 inches of clearance around the island for easy movement and access.
Design the Beverage Station
– Determine the specific features needed: fridge, cooler, open shelves, or a drawer setup for glasses and bar tools.
– Choose the section of the island dedicated to the beverage station, making it easily accessible but separate from the main prep area.
Select Materials and Finishes
– Opt for durable, spill-resistant materials like quartz or granite for the countertop around the beverage area.
– Select cabinetry materials that match or enhance your existing kitchen decor, such as wood finishes in walnut or oak.
– Choose a color scheme that complements the kitchen???s palette; consider integrating rich, warm tones like deep red or dark blue for a sophisticated look.
Integrate Appliances and Features
– Install a wine cooler, mini-fridge, or both, ensuring proper ventilation and electrical setup.
– Include pull-out drawers or slide-out shelves for easy access to glasses, bar tools, and assorted beverages.
– Design an easy-to-clean surface on the countertop for mixing drinks or preparing hot beverages.
Lighting and Electrical Setup
– Install ambient or task lighting directly above the beverage station to highlight its presence and enhance functionality.
– Ensure accessible electrical outlets are in place for appliances like blenders, coffee makers, or kettles.
Professional Installation
– Work with a kitchen design expert or contractor to ensure proper installation and integration of appliances.
– Engage electricians to handle the wiring and installation of electrical outlets and lighting fixtures.
Final Touches
– Add decorative elements like a chic serving tray, a stylish wine rack, or a personalized bar sign to accentuate the station.
– Incorporate plants or small decor items to balance the setup and make it inviting and aesthetically pleasing.
Rotating Kitchen Island for Dynamic Space Utilization
A rotating kitchen island offers a unique and versatile solution to enhance your kitchen’s functionality. This innovative design allows the island’s top to rotate, providing flexibility in usage and optimizing space in dynamic ways. Whether you need additional prep space, an extended dining area, or easy access to all sides of the island, the rotating feature makes it possible without any hassle. You can customize the rotation mechanism to fit your needs???a full 360-degree swivel or limited movement???making it an adaptable centerpiece in any kitchen.
How to Achieve It
Space Assessment
– Measure your kitchen area to determine the optimal size for a rotating island.
– Ensure at least 36 inches of clearance around the island for safe and comfortable movement.
Design the Island
– Decide the dimensions and shape of the island that best fit your space and usage???rectangle, oval, or round are common choices.
– Plan for a sturdy rotating mechanism, such as heavy-duty ball bearings or a revolve platform.
Select Materials and Finishes
– Choose durable and easy-to-clean surface materials like quartz or sealed wood for the countertop.
– Consider the base materials, ensuring they complement your kitchen’s aesthetics, such as painted cabinetry or natural wood finishes.
– Opt for a color scheme that seamlessly integrates with your existing kitchen decor, like neutral shades or contrasting tones that make a statement.
Incorporate Functional Features
– Integrate storage options such as cabinets or shelves along the island???s base for easy access to utensils and cookware.
– Consider adding a small sink or cooktop if plumbing and electrical setups allow.
Implement the Rotation Mechanism
– Use a professional to install the rotating mechanism to ensure stability and ease of use.
– Choose a mechanism that locks the island in place when necessary to avoid unwanted movement.
Install Lighting and Electrical Provisions
– Plan overhead lighting or under-cabinet lights to illuminate the workspace.
– Ensure accessible outlets are available on the island to accommodate appliances or device chargers.
Professional Assistance
– Engage a contractor or carpenter skilled in dynamic kitchen installations to build and fit the rotating feature.
– Collaborate with an interior designer for aesthetic and functional advice tailored to your kitchen.
Finishing Touches
– Add bar stools or seating options that complement the rotating island???s design for a complete look.
– Decorate with centerpieces or functional pieces such as a herb planter or a cutting board, enhancing both style and utility.

Expandable Kitchen Island with Sliding Countertops
An expandable kitchen island with sliding countertops is a smart and space-saving solution that allows you to adjust your workspace as needed. This design features countertops that can slide out to increase the surface area when more prep or dining space is required, and retract back in to save space when not in use. This functionality is perfect for compact kitchens where optimizing every inch is crucial. The sliding mechanism can be smoothly integrated into the island???s design, providing a seamless and flexible culinary experience.
How to Achieve It
Evaluate Your Space
– Measure your kitchen area to determine the appropriate size for the island and its expandable sections.
– Ensure there is enough clearance around the island (at least 36 inches) for easy movement when the countertops are fully extended.
Design the Structure
– Plan a base structure capable of supporting a sliding mechanism, ensuring it aligns with your kitchen???s aesthetic.
– Decide whether the sliding feature will extend the island???s length, width, or potentially both.
Select Materials and Finishes
– Choose sturdy and smooth materials like high-quality plywood or MDF for the sliding components.
– Opt for a countertop material that complements your kitchen design, such as polished granite or butcher block.
– Consider a color scheme that either harmonizes or provides a bold contrast with your existing kitchen decor, utilizing tones like sleek grays, warm woods, or crisp whites.
Install the Sliding Mechanism
– Incorporate heavy-duty sliding tracks or gliders to facilitate easy movement of the countertops.
– Ensure mechanisms are concealed for a clean, uninterrupted visual appeal when the countertops are retracted.
Incorporate Functional Features
– Include storage options like cabinets or drawers beneath the island for optimizing space.
– Consider adding a sink or stovetop on the main countertop if your kitchen layout allows it.
Coordination and Professional Installation
– Work with a carpenter or kitchen designer experienced in innovative and modular furniture concepts.
– Ensure that all mechanical components are installed securely and operate smoothly.
Final Touches
– Add decorative elements like pendant lighting overhead to highlight the island.
– Use stylish and functional decor like a fruit bowl or a small potted plant to enhance the island’s visual appeal when extended.
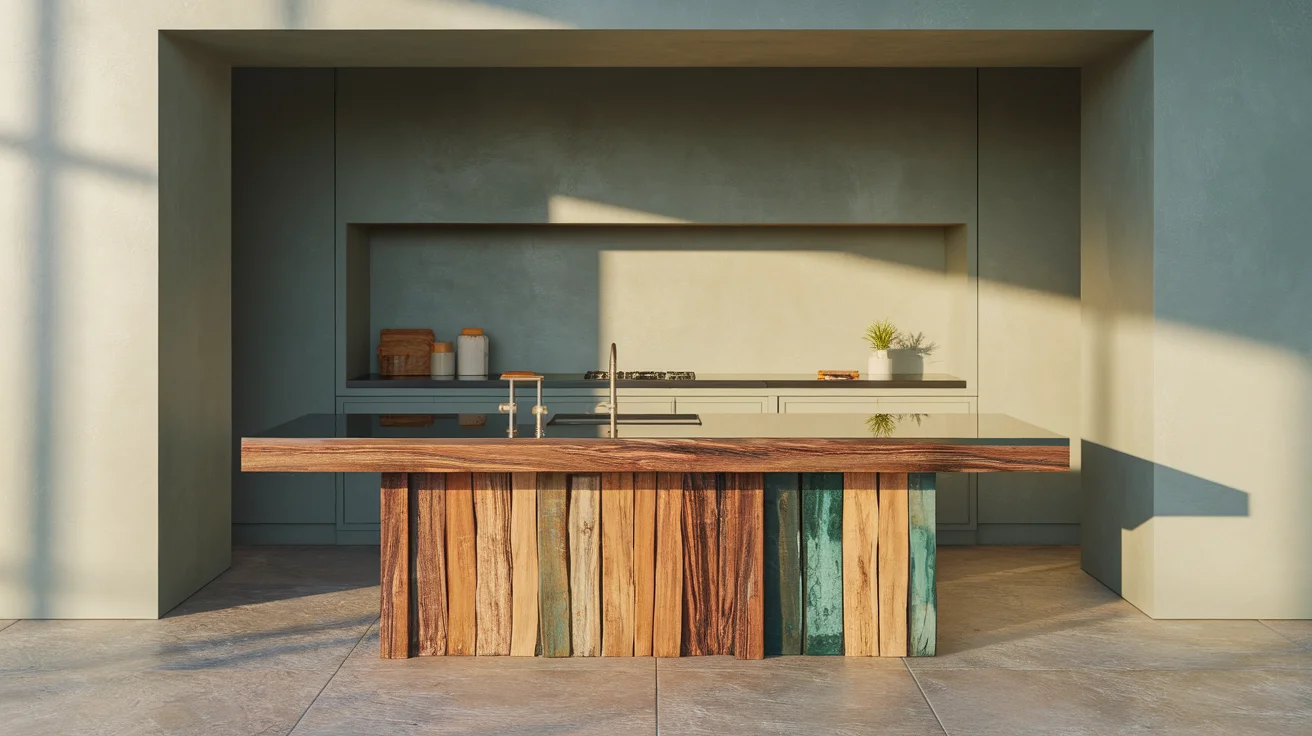
Eco-Friendly Kitchen Island with Recycled Materials
An eco-friendly kitchen island made from recycled materials is a sustainable design choice that marries environmental consciousness with functionality. This concept involves using repurposed wood, reclaimed metal, or recycled glass to construct a charming and unique centerpiece in your kitchen. Not only does this reduce waste and the demand for virgin materials, but it also introduces a rustic, eclectic aesthetic that stands out. By integrating elements like reclaimed wood beams for the base or a countertop made from recycled glass, you can create a conversation piece that complements a range of kitchen styles from modern to farmhouse.
How to Achieve It
Source Recycled Materials
– Visit local salvage yards or resale shops for reclaimed wood, metal, or glass pieces that can be repurposed.
– Consider materials that complement your kitchen’s design, like weathered wood for warmth or sleek metal for an industrial touch.
Plan Your Design
– Sketch out a design that incorporates the recycled materials, ensuring structural stability and aesthetic cohesion.
– Decide on elements like size, shape, and functionality, such as integrating seating, storage, or appliances.
Choose a Color Scheme
– Opt for natural hues that highlight the recycled materials??? textures???think earthy browns, gentle greens, or soft grays.
– Complement the reclaimed materials with eco-friendly finishes in neutral tones to maintain a harmonious look.
Build the Structure
– Create a sturdy frame using durable reclaimed wood beams or metal supports.
– Ensure the base and countertop are securely attached for safety and longevity.
Incorporate Functional Elements
– Integrate open shelves or cabinets using reclaimed wood to provide storage without compromising on style.
– Consider adding a small herb planter or compost bin into the island for added eco-friendly features.
Lighting and Electrical
– Use LED lighting for energy efficiency above the island to illuminate the workspace.
– Install electrical outlets using recycled materials for casing, ensuring functionality while staying true to the eco-friendly theme.
Professional Assistance
– Collaborate with a contractor experienced in sustainable building practices to ensure proper installation and adherence to safety standards.
– Seek advice from an interior designer familiar with eco-friendly products for aesthetic guidance.
Finishing Touches
– Decorate with sustainable accessories like bamboo cutting boards or recycled glassware.
– Place potted plants or a recycled-material fruit bowl on the countertop for a fresh, lively finish.
Movable Kitchen Island with Built-In Appliance Hub
The concept of a movable kitchen island with a built-in appliance hub is a fantastic solution for those who seek flexibility and functionality in their kitchen space. This design features an island on lockable casters, allowing you to reposition it according to your needs, whether it’s for prepping meals, hosting casual gatherings, or making space in your kitchen for another activity. The island cleverly integrates space for small appliances, such as a microwave or toaster, freeing up counter space elsewhere in the kitchen. With dedicated slots or compartments for these appliances, everything stays organized and easily accessible. This design caters to modern living where adaptability and efficiency are paramount.
How to Achieve It
Evaluate Space Requirements
– Measure your kitchen to ensure ample room for moving the island.
– Allow for at least 36 inches of clearance around the island when it???s in use.
Design the Island
– Plan a sturdy base with lockable wheels to allow easy movement and ensure stability when stationary.
– Incorporate compartments or shelves specifically designed to fit your small appliances.
Select Materials and Finishes
– Choose durable surfaces such as stainless steel or butcher block for functionality and aesthetic appeal.
– Opt for a color scheme that blends with your kitchen decor, such as monochrome tones or contrasting shades for a modern look.
Integrate Functional Features
– Design storage for utensils or ingredient drawers alongside the appliance hub for practical use.
– Consider adding collapsible side panels or drop-leaf extensions to increase workspace when needed.
Include Electrical Connections
– Ensure the island features built-in electrical outlets for convenient use of appliances.
– Install wiring safely, potentially integrating retractable cable solutions for a tidy look.
Coordinate Installation
– Work with a skilled carpenter to construct the island, ensuring it???s robust and mobile.
– Engage an electrician to handle the integration of electrical outlets safely and professionally.
Finishing Touches
– Accessorize with a cutting board or organizing trays to enhance functionality.
– Decorate with sleek kitchen towels or small decor items that complement the overall design of the island.

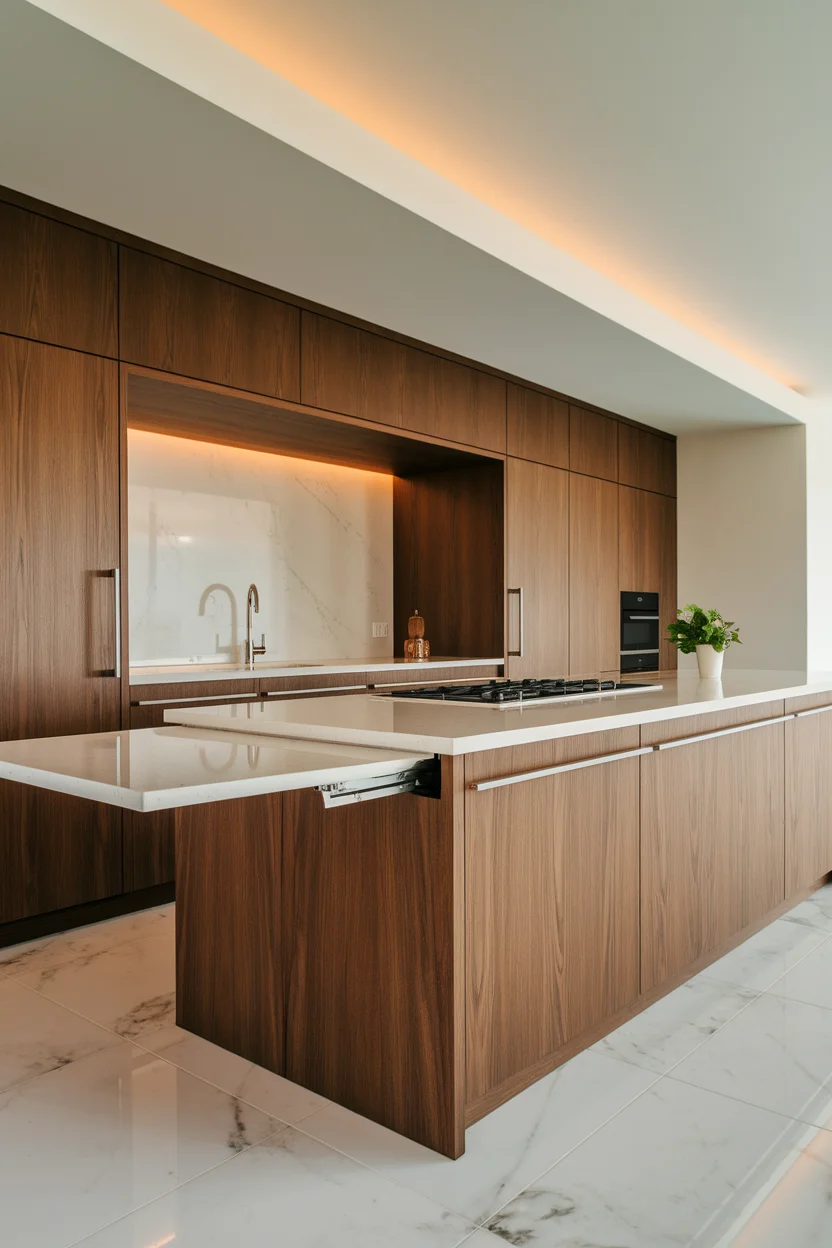
Retractable Countertop Workspace in the Kitchen Island
A retractable countertop workspace in the kitchen island is an ingenious solution that offers flexibility and efficient space utilization in your kitchen area. This design incorporates a pull-out or slide-out surface within the island, which can be extended to provide additional prep, baking, or seating space as needed, and retracted when not in use to maintain a streamlined look. Ideal for smaller kitchens or those that need occasional extra working area, this concept is perfect for home bakers or cooking enthusiasts who require more countertop space intermittently. The retractable feature provides versatility without permanently occupying kitchen space, making it a dynamic addition to any modern kitchen.
How to Achieve It
Design the Structure
– Plan the overall size of the island to accommodate a pull-out component that suits your needs.
– Decide on the mechanism type???whether it slides, folds, or pops out vertically or horizontally.
Select Materials and Finishes
– Choose durable materials like quartz, butcher block, or composite wood for the pull-out surface.
– Ensure all materials match or complement the existing kitchen d??cor; for example, opt for textured wood for a rustic look or sleek quartz for a modern aesthetic.
– Consider a color scheme that complements the kitchen’s palette: think soft neutrals for subtlety or bold shades for a striking visual accent.
Mechanics and Installation
– Integrate high-quality, durable tracks or hinges that can support the weight of the countertop when extended.
– Engage with a skilled carpenter or craftsman to ensure precise installation and smooth operation of the retractable feature.
Incorporate Functional Elements
– Design underneath storage that accommodates the retractable space, like drawer systems or open shelving.
– Include space for kitchen stools or chairs if the retractable countertop will be used as a dining area.
Professional Assistance
– Collaborate with an interior designer for aesthetic and functional insights tailored to your kitchen style.
– Hire professionals for installation to ensure the mechanism operates smoothly and safely.
Finishing Touches
– Enhance the retractable space with overhead lighting to illuminate work or dining activities.
– Decorate with functional yet stylish elements, such as a small cutting board or decorative bowl, to complement the space’s utility and appearance.