IKEA has long been a beloved destination for functional and affordable home furnishings, and the TROFAST storage system is no exception. This versatile piece, originally designed for toy organization, has captured the imaginations of DIY enthusiasts and home decorators alike. Its modular design, sturdy construction, and adaptability make it an ideal candidate for creative reinterpretation. From personalized playroom solutions to unexpected furniture reinventions, the possibilities are endless. In this article, we’ll explore some inventive IKEA TROFAST hacks and ideas that can transform your space while reflecting your unique style.
Colorful Reading Nook for Kids
Transform a basic Ikea Trofast unit into a vibrant and inviting reading nook where kids will love to spend time with their favorite books. This creative hack not only organizes reading materials neatly but also adds a burst of color to any room, making it both functional and fun.
### How to Achieve It
Materials Needed:
– Ikea Trofast frame
– Paint in assorted bright colors (safe for kids)
– Primer
– Paintbrushes or rollers
– Assorted storage bins/baskets
– Comfortable cushions or a small bean bag
– Removable wall decals (optional)
Steps:
1.
Preparation:
– Disassemble the Trofast frame if needed, clean and dry all surfaces to ensure paint adheres properly.
– Apply a primer to the wooden parts of the Trofast structure, allowing it to dry completely.
2.
Painting:
– Choose a palette of three to four complementary bright colors that will make the nook feel lively and inviting.
– Paint the Trofast structure in sections, using different colors on each shelf or segment. Ensure each coat dries thoroughly before applying additional coats.
3.
Assembly:
– Once the paint is fully dry, reassemble the Trofast unit.
– Secure baskets on the shelves. These can be used for storing books, small toys, and other reading materials.
4.
Cozy Additions:
– Place soft cushions or a bean bag on top or around the nook for comfortable seating.
– Stick removable wall decals around the perimeter of the reading nook for a playful touch.
5.
Final Touches:
– Organize books by color, size, or theme in the bins for an organized look.
– Add a small basket or container for bookmarks and reading accessories.
Color Scheme:
– Use bright and cheerful colors like turquoise, coral, yellow, and lime green to create a stimulating environment.
This customized reading nook not only serves as a perfect relaxation corner for little ones but also enhances the aesthetic of the playroom or bedroom with its colorful appeal.

Vertical Garden Display
Transform an Ikea Trofast unit into a vertical garden display that brings a touch of nature indoors. This innovative hack allows you to cultivate a variety of small plants, herbs, or succulents, creating a green sanctuary in your home, perfect for those who have a passion for gardening but limited space.
### How to Achieve It
Materials Needed:
– Ikea Trofast frame
– Waterproof paint or wood sealant
– Paintbrushes
– Assorted small potted plants, herbs, or succulents
– Plant-friendly LED grow lights (if needed)
– Waterproof liners for shelves
– Fertilizer and potting soil (optional)
– Decorative pebbles or stones (optional)
Steps:
1.
Preparation:
– Disassemble the Trofast frame if necessary, and clean all surfaces thoroughly.
– Use waterproof paint or a wood sealant to protect the Trofast structure, especially if it’ll be exposed to moisture. Allow it to dry completely.
2.
Arrange the Plants:
– Decide on the placement of your plants, taking into account the size and light needs of each.
– Line each shelf with a waterproof liner to protect the frame from potential water damage.
3.
Assembly:
– Reassemble the Trofast unit once the paint or sealant is dry.
– Secure the waterproof liners on each shelf before placing the plants.
4.
Lighting:
– If your vertical garden doesn’t receive adequate natural light, install small, plant-friendly LED grow lights above or next to the unit.
– Ensure that the lights are suitable for promoting plant growth.
5.
Final Touches:
– Use decorative pebbles or stones on top of the soil for added visual appeal and to help retain moisture.
– Regularly check the plants for watering needs and use fertilizer as required to maintain healthy growth.
Color Scheme:
– Consider using neutral tones for the frame, like white, grey, or light wood colors, to make the greenery pop and create a fresh, calm atmosphere.
This vertical garden display not only serves as a stunning natural feature in any room but also improves air quality and offers the calming benefits of an indoor green space.

Trofast Art Station for Kids
Unleash your child???s creativity by transforming an Ikea Trofast unit into a dedicated art station. This clever hack not only organizes art supplies neatly but also provides a space where kids can explore their artistic talents. It’s an excellent way to encourage imaginative play and keep creative chaos contained.
### How to Achieve It
Materials Needed:
– Ikea Trofast frame
– Chalk paint or whiteboard paint
– Paintbrush or a roller
– Assorted storage bins
– Hooks or clips
– A child-sized easel (optional)
– Assorted art supplies (crayons, markers, paper, etc.)
– Magnetic strips or board (optional)
Steps:
1.
Preparation:
– Disassemble the Trofast frame if needed, and thoroughly clean all surfaces.
– Decide if you want to use chalk paint or whiteboard paint for one or more surfaces. This will allow kids to draw directly on the Trofast.
2.
Painting:
– Apply chalkboard or whiteboard paint to the desired surfaces of the Trofast unit, which will give kids a space to jot down ideas or create temporary drawings.
– Allow ample time for the paint to dry completely.
3.
Organizing Supplies:
– Reassemble the Trofast, placing art supplies in assorted storage bins, organizing them by type for easy access.
– Use hooks or clips on the sides to hang scissors, rulers, or other tools.
4.
Additional Features:
– Set up a child-sized easel nearby for painting or sketching.
– Attach a magnetic strip or a small board to one side for displaying works of art or holding metallic containers with supplies.
5.
Final Touches:
– Label storage bins with pictures or words to help kids identify contents easily.
– Ensure art supplies are safe and age-appropriate for your child.
Color Scheme:
– Opt for bright, playful colors like sky blue, sunny yellow, or candy pink for the structure. Use black or white for chalk or whiteboard surfaces to keep it functional and stylish.
This custom art station becomes an inspiring corner for kids to explore and express their creativity while keeping the art mess manageable and organized.

Trofast Pet Station
Create a dedicated space for your furry friends by transforming an Ikea Trofast unit into a functional and stylish pet station. This hack offers organized storage for pet supplies, feeding areas, and even cozy sleeping nooks, making it a perfect solution for pet lovers looking to incorporate pet essentials seamlessly into their home decor.
How to Achieve It
Materials Needed:
– Ikea Trofast frame
– Waterproof paint or sealant
– Paintbrushes or rollers
– Assorted storage bins
– Pet bed or cushion
– Pet feeding bowls
– Hooks for leashes and collars
– Small toys or treats
Steps:
1.
Preparation:
– Disassemble the Trofast frame if necessary, and clean all parts thoroughly.
– Apply waterproof paint or sealant to protect the structure from potential spills and scratches. Allow the paint to dry completely.
2.
Organizing Storage:
– Reassemble the Trofast unit and utilize the storage bins for organizing pet supplies like food, grooming tools, and toys.
– Label each bin with images or words for easy identification.
3.
Create a Feeding Area:
– Designate a section for placing feeding bowls. Use a waterproof mat under the bowls to catch spills and keep the area tidy.
4.
Sleeping Space:
– Use the lower section of the Trofast for a cozy sleeping nook by fitting a pet bed or cushion where your furry friend can relax comfortably.
5.
Final Touches:
– Attach hooks to the side for hanging leashes and collars.
– Store small toys or treats in easily accessible bins.
Color Scheme:
– Consider using a color scheme that complements your home decor, such as earthy tones like beige, soft gray, or muted blue, which create a calming and cohesive look.
This Trofast Pet Station offers a practical and chic solution for managing pet essentials while ensuring your home remains stylish and organized.

Craft Supply Organizer and Workspace
Transform an Ikea Trofast unit into a well-organized craft supply station and workspace. This hack is perfect for craft enthusiasts looking to sort their materials neatly while creating a dedicated space for crafting projects. By utilizing the Trofast’s storage and surface area, you can keep all your supplies in one tidy spot for easy access during creative sessions.
### How to Achieve It
Materials Needed:
– Ikea Trofast frame
– Pegboard or corkboard
– Assorted storage bins
– Hooks and clips for tools
– Crafting tools and supplies (fabric, paper, scissors, etc.)
– Small tabletop or additional board (for workspace surface)
– Decorative washi tape or drawer liners (optional)
Steps:
1.
Preparation:
– Assemble the Trofast frame and clean all surfaces to ensure it’s ready for organization.
– Decide where to place your pegboard or corkboard; it could be attached to the wall behind the unit or on one side.
2.
Workspace Setup:
– Clear the top of the Trofast unit and, if needed, install a small tabletop or board to serve as a crafting workspace.
– Secure it with brackets if necessary to ensure stability and safety.
3.
Organizing Supplies:
– Place storage bins along the Trofast shelves, categorizing items like fabrics, paints, or papers.
– Use hooks and clips on the pegboard to hang tools such as scissors, tape, rulers, and brushes for easy access.
4.
Personalization:
– Line the storage bins with decorative washi tape or drawer liners to add a personal touch and to visually differentiate the categories.
– Label each bin to ensure that everything has its designated place.
5.
Final Touches:
– Arrange a small decorative plant or vase on the top for an added aesthetic touch.
– Ensure the workspace is well lit, possibly adding a desk lamp for better visibility while crafting.
Color Scheme:
– Opt for calming and neutral tones for the frame, such as white or light gray, which will allow the colorful craft supplies to pop, creating an inspiring and organized crafting environment.
This Craft Supply Organizer and Workspace not only optimizes your crafting area but also keeps the space clutter-free, making every crafting adventure a breeze.

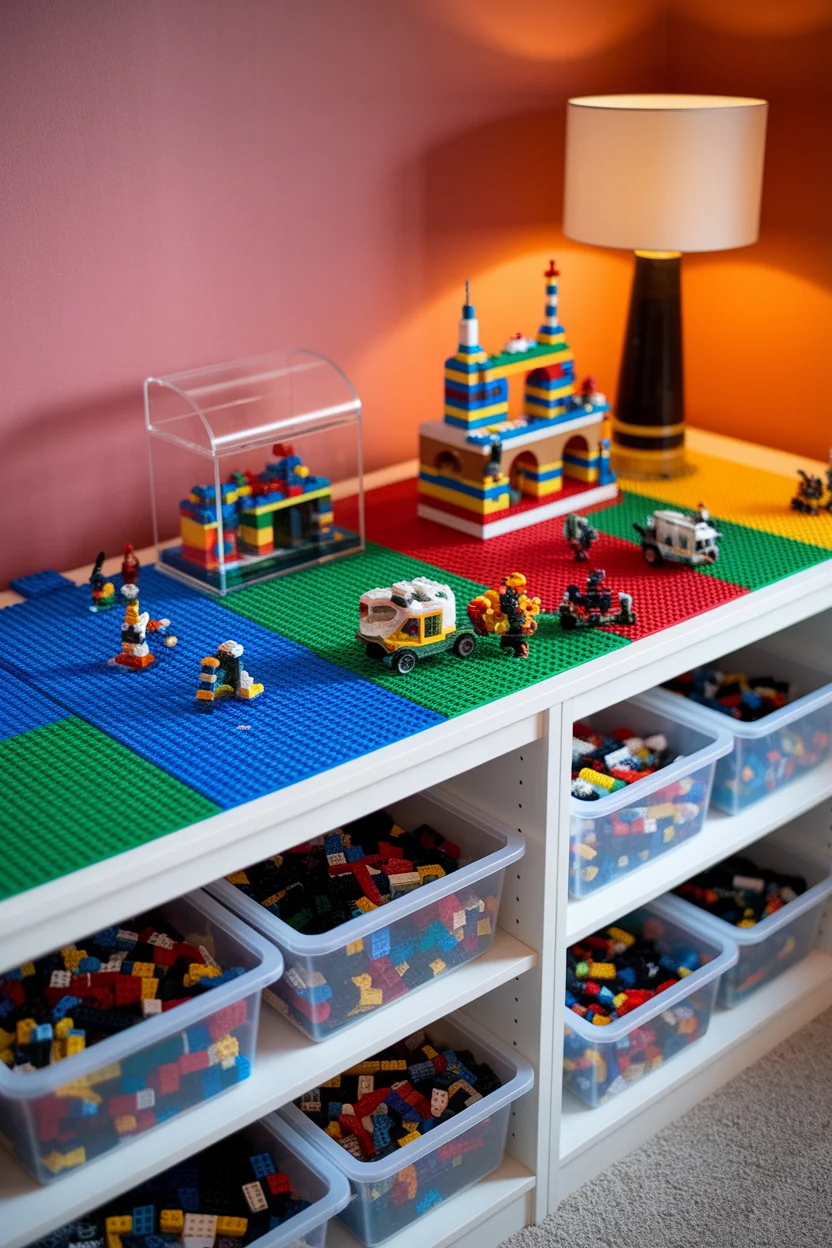
Customized Lego Play and Display Station
Transform an Ikea Trofast unit into a dedicated Lego play and display station, perfect for keeping Lego sets and pieces organized while providing a creative play surface for children. This innovative hack maximizes both storage and play area, making it an ideal addition to any child’s room, where they can let their imagination run wild and showcase their creations.
How to Achieve It
Materials Needed:
– Ikea Trofast frame
– Baseplates for Lego (compatible with standard Lego pieces)
– Strong adhesive or double-sided tape
– Assorted storage bins
– Small drawer organizers (optional)
– Clear display cases or frames (optional)
– Lego sets and pieces
Steps:
1.
Preparation:
– Disassemble the Trofast if necessary and clean all surfaces to ensure a smooth assembly process.
– Arrange the Lego baseplates on the top surface of the Trofast unit to create a play area, cutting them to size if needed.
2.
Baseplate Installation:
– Use strong adhesive or double-sided tape to secure the baseplates onto the top surface of the Trofast, ensuring a stable play area.
– Allow the adhesive to set completely before proceeding to the next steps to ensure a strong bond.
3.
Organizing Lego Pieces:
– Reassemble the Trofast unit and arrange storage bins on the shelves, categorizing them by color, shape, or Lego set for easy access.
– Use small drawer organizers within the bins to separate pieces further if necessary.
4.
Display Creations:
– Consider using clear display cases or frames to showcase completed Lego projects, placing them on top of the unit or on nearby shelves.
– Rotate displays regularly to keep the station fresh and engaging.
5.
Final Touches:
– Label storage bins to help identify the contents quickly, encouraging kids to maintain an organized play space.
– Include a small selection of mini-figures or unique Lego pieces for display to inspire play.
Color Scheme:
– Opt for a neutral or matching color scheme that complements the vibrant Lego pieces, such as soft gray, white, or a light pastel. This ensures that the colorful bricks remain the focal point of the space.
This Customized Lego Play and Display Station not only keeps playtime organized but also allows for easy transition from play to display, fostering creativity while maintaining a tidy environment in your child’s room.
Trofast Homework Station
Transform an Ikea Trofast unit into a dedicated homework station that encourages productivity and organization for children and teens alike. This clever hack combines ample storage for school supplies with a functional workspace, making it an ideal solution for nurturing effective study habits in a structured environment.
### How to Achieve It
Materials Needed:
– Ikea Trofast frame
– Chalkboard or corkboard
– Dry erase board (optional)
– Assorted storage bins and organizers
– Hooks or clips
– Comfortable chair or stool
– Desk lamp
– Stationery supplies (pens, pencils, notebooks, etc.)
Steps:
1.
Preparation:
– Assemble the Trofast frame and clean all surfaces thoroughly. Ensure the unit is stable and placed in a well-lit area suitable for focused work.
2.
Workspace Setup:
– Attach a chalkboard or corkboard above the unit or to one side for notes and reminders. Add a dry erase board if desired for jotting down quick memos or to-do lists.
– Ensure a comfortable chair or stool is available for extended study sessions, positioned at an appropriate height for the workspace.
3.
Organizing Supplies:
– Arrange storage bins on the shelves to categorize items like books, notebooks, and stationery. Use small organizers within bins to further separate supplies such as pens, erasers, and paper clips.
– Use hooks or clips on the side to hang school bags or headphones, keeping them within easy reach.
4.
Enhancing the Study Environment:
– Install a desk lamp to ensure the workspace is well-lit, reducing eye strain during study sessions.
– Personalize the space with motivational quotes or pictures to create an inspiring study atmosphere.
5.
Final Touches:
– Label storage bins for easy identification and quick access to materials.
– Keep a small, rotating selection of educational games or puzzle books in a designated bin to encourage mental breaks and creativity.
Color Scheme:
– Use neutral and calming colors like soft gray, white, or pastel blue to create a serene and focused environment conducive to studying.
This Trofast Homework Station not only organizes school materials efficiently but also fosters a conducive environment for learning and productivity, making homework a more manageable and organized task for students.

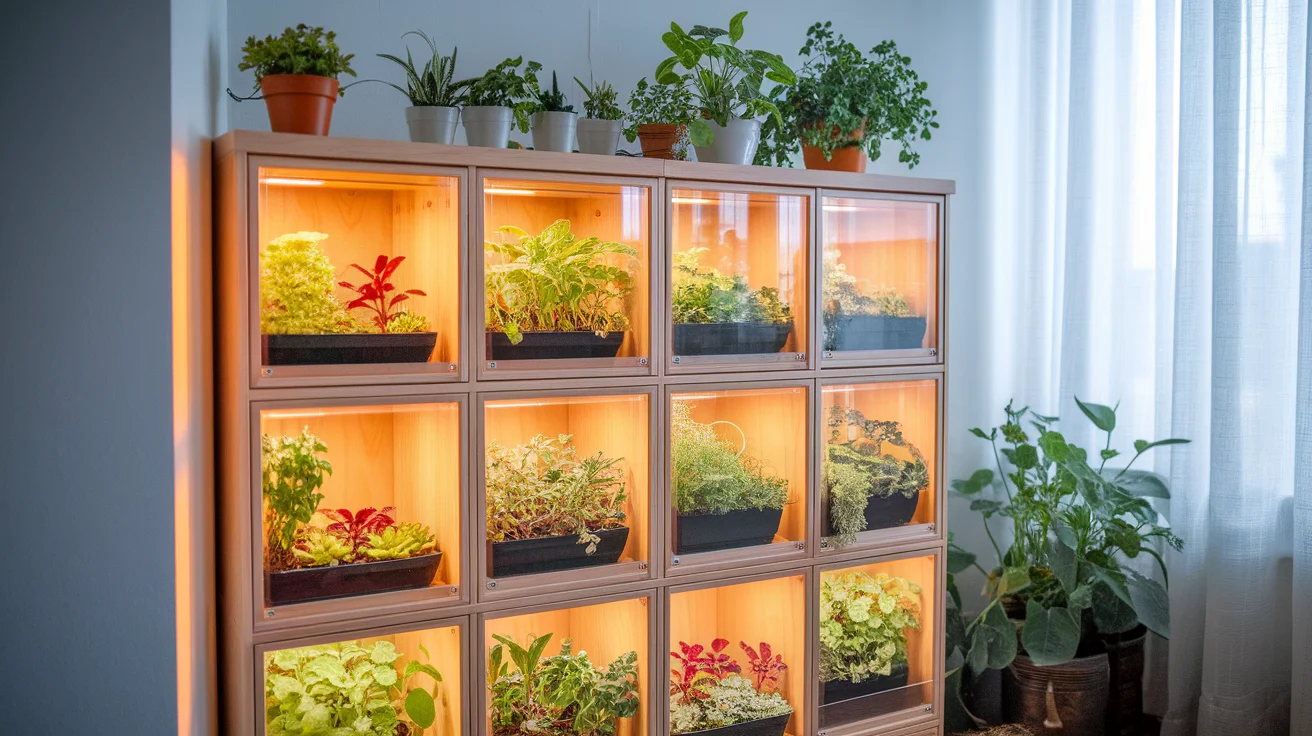
Trofast Mini Greenhouse Cubby
Transform an Ikea Trofast unit into a charming mini greenhouse cubby, perfect for growing small plants, herbs, or succulents indoors. This innovative hack not only adds a green touch to your home but also provides an organized space to nurture your plants, turning any room into a mini oasis.
### How to Achieve It
Materials Needed:
– Ikea Trofast frame
– Clear acrylic sheets or glass panels
– Small hinges and latches
– Waterproof paint or sealant
– Assorted small plants or herb pots
– Waterproof liners for shelves
– LED grow lights (if needed)
Steps:
1.
Preparation:
– Disassemble the Trofast frame if needed, and clean all parts thoroughly to ensure a clear work surface.
– Apply waterproof paint or sealant to protect the wooden structure, focusing on areas that might be exposed to moisture.
2.
Creating Transparent Panels:
– Cut clear acrylic sheets or glass panels to fit the front of each Trofast cubby, creating “windows” for your mini greenhouse.
– Attach small hinges to one side of each panel, allowing them to open like doors, and secure with latches on the opposite side.
3.
Assembly and Plant Setup:
– Reassemble the Trofast unit and line each shelf with waterproof liners to catch any excess water from plant pots.
– Arrange small plants or herb pots on the shelves, organizing them to allow adequate lighting and airflow.
4.
Lighting (Optional):
– If natural light is inadequate, install LED grow lights above or beside the unit to ensure your plants receive sufficient light.
– Set a timer for the grow lights to mimic natural daylight cycles, fostering optimal growth conditions.
5.
Final Touches:
– Consider labeling each cubby with the names of the plants or herbs for easy identification and care.
– Regularly monitor plant health and water as needed to maintain a lush and vibrant mini greenhouse.
Color Scheme:
– Opt for natural, earthy tones for the frame, such as soft green, light brown, or beige, to complement the vibrant greenery and create a harmonious, organic feel.
This Trofast Mini Greenhouse Cubby not only elevates your home’s decor with its natural beauty but also offers a practical and stylish way to enjoy indoor gardening, fostering a tranquil and refreshing atmosphere.
Trofast Coffee Bar Station
Convert an Ikea Trofast unit into a stylish and functional coffee bar station that provides a dedicated space for brewing your favorite cup of coffee or tea. This unique hack maximizes storage for coffee essentials like mugs, pods, and accessories while offering a charming focal point in your kitchen or living area.
How to Achieve It
Materials Needed:
– Ikea Trofast frame
– Stain or wood paint in a color to match your decor
– Paintbrush or roller
– Assorted storage bins or baskets
– Coffee accessories (mugs, coffee pods, filters, spoons, etc.)
– Small Coffee maker or Espresso machine
– Hooks for hanging mugs
– Decorative items (e.g., small plants or artwork)
Steps:
1.
Preparation:
– Disassemble the Trofast frame if necessary, and thoroughly clean all pieces.
– Apply the chosen stain or wood paint to the frame, ensuring an even coat, and allow it to dry thoroughly for a polished finish.
2.
Reassembly and Setup:
– Once the paint is fully dry, reassemble the Trofast unit.
– Arrange the storage bins or baskets in the Trofast to organize coffee pods, filters, and other small coffee-making essentials.
3.
Installing Hooks:
– Attach hooks on the outside or the sides of the Trofast unit for hanging mugs, keeping them easily accessible for your morning brew.
4.
Place Coffee Maker:
– Designate the top of the Trofast as a surface for your coffee maker or espresso machine, ensuring it???s in a convenient spot for daily use and can be plugged in easily.
5.
Decorative Additions:
– Add personal touches with decorative items like a small plant, framed artwork, or a mini chalkboard for coffee quotes, enhancing the aesthetic appeal.
– Make sure the color scheme of the decorative elements complements the chosen paint or stain on the Trofast to maintain a cohesive look.
Color Scheme:
– Select warm, inviting colors like mocha brown, black, or a deep navy blue for the frame to create a cozy and stylish ambiance that mimics your favorite coffee shop.
This Trofast Coffee Bar Station not only organizes your coffee essentials neatly but also elevates your living space, providing a delightful coffee nook where you can relax and enjoy your brew.

Trofast Gaming Console Station
Transform an Ikea Trofast unit into a sleek gaming console station, perfect for organizing and displaying your gaming equipment and accessories. This clever hack creates a dedicated space where gaming consoles, controllers, and games are easily accessible and neatly stored, enhancing your gaming experience while keeping your entertainment area tidy.
How to Achieve It
Materials Needed:
– Ikea Trofast frame
– Ventilated shelving or aluminum grills
– Cable management clips or ties
– Paint in a color of your choice
– Paintbrushes or rollers
– Assorted storage bins or baskets
– Gaming consoles and controllers
– Power strip with surge protection
– LED light strips (optional)
– Decorative vinyl decals or skins (optional)
Steps:
1.
Preparation:
– Disassemble the Trofast frame if needed and clean all parts to ensure a smooth work surface.
– Paint the frame in a color that complements your room decor and gaming setup, then allow it to dry completely.
2.
Shelving for Consoles:
– Replace standard shelving with ventilated shelving or aluminum grills to allow for better airflow around your gaming consoles, preventing overheating.
3.
Cable Management:
– Reassemble the Trofast unit and arrange the gaming consoles on the shelves.
– Use cable management clips or ties to organize and hide the cords for a neat appearance.
4.
Organizing Accessories:
– Arrange storage bins or baskets on the Trofast shelves to store controllers, games, and other accessories, ensuring everything is organized and easy to find.
– Install a power strip with surge protection to manage power needs safely.
5.
Lighting and Personalization:
– Attach LED light strips along the edges of the unit for ambient lighting that enhances the gaming experience (optional).
– Use vinyl decals or skins to personalize the Trofast unit, adding flare centered around gaming themes or favorite game logos (optional).
Color Scheme:
– Choose sleek, modern colors like matte black, steel gray, or vibrant red to create an edgy and contemporary look that suits a high-tech gaming setup.
This Trofast Gaming Console Station not only organizes and optimizes your gaming space but also brings an aesthetic appeal to your entertainment area, making it the perfect addition for any gaming enthusiast.